(19
ratings, average: 4,37
out of 5)
 When deciding on a project for summer cottage construction, first of all, not only the comfort, but also the appearance of the future building is assessed. A private house is considered to be a place for relaxation, so it should be made beautiful and comfortable. If you want to build a unique greenhouse, house or gazebo on your garden plot, then you should try to think about building a geodesic dome. In appearance, this is a rather complex structure, but even a not very experienced builder can build it, and the material costs will be small. This article will describe how to build a dome with your own hands.
Definition of a geodesic dome
 Experts believe that most people have no idea about such a building design because it is very rare. That is why it is worth describing in detail all the features and technical characteristics of a geodesic dome. Inventor Richard Fuller developed buildings with a load-bearing mesh shell. First he took a very strong structure in the form of a sphere and divided it into small triangles, whose sides were located on regular geodesic lines. Richard Fuller's calculations were able to make the construction of the dome simple and accessible to anyone.
The inventor believed that such a unique building design was supposed to solve the problem of quickly building a cheap and comfortable house. This development was not appreciated by experts, and it not used in mass construction. However, for building a unique cafe or a beautiful summer house, a Fuller geodesic dome is the best option.
Richard Fuller's design is a fairly stable design. A geodesic dome distributes the entire mass evenly, can withstand enormous loads and reduces financial investments in the construction of the foundation. The unique spherical shape is able to withstand the most powerful gusts of wind. Savings in the construction of such houses are due to a reduction in the total side surface area. In the dome itself, round walls help ensure high-quality air circulation, creating a comfortable microclimate.
The main disadvantage can be considered very complex, compared to simple houses, mathematical calculations. Since the design consists of a huge number of parts, then it is necessary to insulate quite a lot of joints. The geodesic dome has no other significant disadvantages.
Measurements and calculations
If you want to build a geodome with your own hands, you first need to carry out all the mathematical calculations. The main task of calculating a geodesic dome is to have a certain radius, get the following data:

It is necessary to focus on such a unit for building a geodome as a special connector. This part is a unit that connects all the rafter parts. Since the connector is the main element for securing the entire structure, it is made of durable, high-quality material.
Depending on the design of the geodesic dome and its location in it, the connecting connector must have a different number of petals. All fastenings for building a domed house can be purchased or made with your own hands. A good example would be a connector from regular perforated tape. This type of connector has a very valuable quality because it is quite easy to adjust the angle of inclination. Geodesic domes with small diameters can be built using the connectorless method. However, when building a large house, it is necessary to use a metal connector to fasten the ribs.
In order to make calculations, you need to know the dimensions of the building. It is necessary to remember that the total area of the manufactured geodesic dome will be slightly less than the area of the circle, because at the base there is a polyhedron that is inscribed in the circle. The height of the building can be determined by the total length of the diameter. It is worth noting that the greater the height of the dome, the more the structure will resemble a sphere.
To calculate the necessary details of the future design, it is worth using a special online calculator. You need to enter data about the height and radius of the building, and the calculator will calculate the geodome and provide the length and number of ribs, type and number of connecting connectors.
DIY construction
 The most suitable structures for dome construction can be considered small greenhouses, cozy gazebos or country houses. First you need to choose a place to build. If it is a greenhouse, then you need to find a well-lit area. Suitable for a house or gazebo slightly shaded area. The area for any of these buildings is leveled, and then all debris and tree roots are removed from it.
Greenhouse
A dome greenhouse is the easiest to build. To assemble it, you do not need a foundation, and the material for the base can be ordinary boards, bars or metal pipes. On a previously prepared surface, it is necessary to begin assembling the base of the greenhouse-dome. First of all, the triangles are assembled and fastened together. In order not to confuse the edges, they must be signed and checked against the drawing. If the greenhouse is small, then during assembly the connecting connector should be replaced with simple mounting tape and fastening materials.
The manufactured geodesic dome should be covered with a simple film. A domed greenhouse will look much better, which covered with polycarbonate sheets. Triangles cut from polycarbonate must be secured to the frame, and all joints must be covered with decorative slats. From the street, the geodome can be decorated with decorative stone, flowers can be planted, and a small fence can be installed. Such a domed greenhouse will be a unique decoration for any country house.
Alcove
You can build a gazebo in the form of a geodesic dome. For this it is necessary adhere to these recommendations:

After manufacturing the structure of the domed gazebo, an equally important stage of work follows. It consists of covering a round gazebo with a dome. A variety of materials can be used for this. If the geodesic dome structure is not completely covered, and a couple of sections of the gazebo are left open, then they can be decorated with beautiful fabric. In such a comfortable gazebo, you can happily spend your free time with family and friends.
House
The dome can become the basis of a unique house on a summer cottage. The main difference from a gazebo and a greenhouse is the need to build a foundation. In order to build a domed house, it is worth adhere to the following recommendations:
- you need a well-insulated foundation;
- special corner posts are attached to the base of the foundation, which are strengthened with horizontal struts;
- the structure of the domed house is assembled;
- The outside of the house must be covered with plywood sheets.
Having installed the door and window frames, it is worth starting finishing the geodesic house from the inside. Good insulation is placed in all openings, which is sewn up with sheets of plywood. In order to build a domed house, no more than three months of work are needed. The geodesic dome shape will help save on materials.
 When living in such a house, you can appreciate the main advantages of this design.
Based on one parameter, you can select others, which will be calculated automatically. The radius of the base can differ from the radius of the sphere only when rounding the edge of the figure.
Ribs
Attention! The length is indicated along the top edge (usually it is longer), in some cases (for example, ? spheres) the total length of the product may be greater due to the bottom edge. This happens when aligning (to a circle) the edge of a figure, because the computer program tries to orient the edges of the edge into one common plane; this is necessary for the convenience of installing the structure on a plane (the surface of a planet, for example).
 Please note that the lengths of the ribs are indicated point-to-point, so the connectors (whatever design they are) “eat up” part of the length on each side.
How to find out the angle of pentacarbon and hexagon? The corner, that is, we put it on a plane and pull the center to the top!??? I really need help please

Dome frame
There are several ways to assemble a dome frame. The simplest and most accessible method is the connectorless method, which can easily be used to assemble domes up to 40 m in diameter.
Comparison by number of materials
The production of a log house with an area of 250 m2 requires more than 150 m3. rounded 22-gauge logs, construction and finishing lumber. At the same time, the construction of one passive wooden geodesic dome 14 m in diameter, with three floors, with a total area of 350 m 2 requires 10 m 3 of lumber, 12 m 3 of slab material (LVL, OSB3, FSF). ALL!!!
Instructions
See instructions for using the site. Registered users can create their own articles (also questions), add photo galleries, etc.
A greenhouse at the dacha has long become not only a help in growing vegetables, but also an opportunity to realize one’s creative ambitions. Among all the innovative solutions, the geodesic dome, the brainchild of modern architecture, deserves special attention. The interest in the original design is explained simply - even an inexperienced craftsman can install such a greenhouse on his site - the hemisphere is easily assembled from simple parts, and the productivity of its beds is not inferior to the yields from standard structures.
Geodesic dome - beautiful, practical and simple
The growing popularity of domed greenhouses is due to several factors:
- Installation does not require a solid foundation, since its design is much lighter than conventional shelters of similar size.
- The structure is easy to assemble and disassemble, and if necessary, it is easy to move it to a new location.
- The hemispherical shape is highly durable and stable. The cellular frame better withstands strong winds, easily withstands snowfalls and has good earthquake resistance.
- Compared to traditional forms of shelters, the construction of a dome greenhouse is cheaper, since complex equipment is not required for installation. Simple available materials are used in construction - wooden blocks or plastic tubes for the frame, screws, polycarbonate, agrofibre or greenhouse film for cladding.
- Due to the unique sectional structure, there is no need to install internal supports, and this significantly saves building materials.
- Unlike rectangular greenhouses in a hemisphere, there is no need to orient the beds relative to the cardinal points - the plants are always well lit.
In the geodome it is easy to provide the necessary microclimate for growing several crops of garden crops per year. The soil always warms up well, and to maintain temperature stability, environmentally friendly heat accumulators - water tanks - are used.

In winter, the geodome can withstand even heavy snowfall
How to build a dome greenhouse yourself
It is not difficult to build such a structure on your site. To do this, you will need to calculate the dimensions of the sections, print out the assembly diagram, prepare the frame parts, clear the space for installing the greenhouse, and you can begin installation.

Options for dome greenhouses
Principles of designing a dome frame
At their core, all geodesic domes are polyhedra, the faces of which form a surface that is as close as possible in shape to a sphere. The shape of the edges may be different, but the triangle is considered the most stable and stable. Therefore, in most cases, the main structural element for creating a hemispherical frame is a triangle.

Triangular sections - the basis of a streamlined and stable frame
For the construction of the frame of small domed buildings in summer cottages - greenhouses, gazebos, guest houses - frame-panel technology based on isosceles triangles of different sizes is most often used. The smaller the size of the sections, the more of them will be needed to create a spherical greenhouse. The principle of connecting them together is similar to sewing a soccer ball - the triangles are connected into convex hexagons and pentagons, which are combined into a stable hemisphere.
Advice! If the connection angles of the fragments were not taken into account when calculating the geodome, then installation is best done using connectors with 4, 5 and 6 blades.
Formula for calculating the length of the dome elements
In order not to make mistakes during the assembly process, you need to calculate in advance the length of all the ribs, the correct sequence of their alternation, and the angles at which the elements are connected. To draw up an optimal scheme, it is necessary to use special formulas. The calculation of a geodesic dome is based on specific dimensions:
- radius of the base of the structure;
- height of the greenhouse (expressed as a fraction of the diameter of the sphere, H);
- sectioning frequency (V).

Wooden blocks for installation
The higher the numeric index V (1, 2, 3...), the more types of edges will need to be prepared. Dome 1V is a truncated icosahedron, all edges are the same length. This structure is more like a pyramid with five sides. For the construction of a home greenhouse, domes 2V (two types of ribs, H = radius) and 3V (ribs A, B, C, height of the structure H = 5/8, 7/12, 5/12 diameter) are best suited.
The length of each type of ribs (La, Lв, Lс...) is calculated using the formula L=R*K, where R is the radius of the base of the frame, and K is the coefficient of splitting frequency.

Odds table
To calculate the required amount of material for cladding, use the formula for calculating the area of a sphere: S=2π *R*H, where R is the radius of the base, and H is the calculated height of the greenhouse. For example, with a radius of the base of a 3V greenhouse of 4 m and a height of 3/8d, the calculation of the area will be as follows:
S=2*3.14*4*(3/8*8) = 75.36 m2
Preparing for frame installation
When building a geodesic dome with your own hands, you need to choose a light and durable material for the frame - wooden blocks, light metal rods or plastic pipes. It is better to impregnate wooden blocks with an antifungal compound before painting. When preparing fragments, it is extremely important to maintain accurate markings - all parts of the same type must be interchangeable.
Advice! Paint ribs of the same length with the same color. For example: ribs A are red, B are blue, C are yellow. To make it easier to work with the color assembly diagram, the markings of the finished ribs should match the markings on the drawing.
The number of fins by type and connectors for mounting each type of dome is calculated according to the diagrams.
Field work and foundation installation
To install a geodesic dome in your country house, you must select an open, unshaded area. Fertile soil can be temporarily removed from the site, and the surface itself can be covered with clay and carefully leveled and compacted. If the soil is unstable, then you will have to pour a small foundation under the base or drive support piles under each corner of the base (the shape of the figure follows the outline of the bottom row of the diagram - a ten-, eight- or dodecagon).
The height of the base depends on how the building is intended to be used - for a light summer greenhouse 15-20 cm is enough, and for a winter greenhouse with warm beds it is better to raise the walls by 50-70 cm. The base is usually made of thick timber or wooden panels. A low temporary structure can be installed directly on bricks or stones laid at the corners of the bottom row of the frame.

Installation of the dome greenhouse base
Assembly and covering of the frame
It is better to assemble the structure from the bottom up, connecting the ribs with connectors or screws in accordance with the diagram. It is more convenient to assemble the top of the dome on the ground, and only then attach it to the frame. It is better to install such a “construction set for adults” with an assistant - it is more convenient to fix the parts. To enter during assembly, a door frame is inserted instead of several dome elements.
Advice! For ventilation, install 2 window frames in the upper part of the dome, made according to the internal dimensions of the triangular element.
The next stage is covering the frame. For these works, a dense transparent material is selected - greenhouse film, polycarbonate or glass. There are several ways to cover a domed greenhouse:
- the finished frame is covered with film on top;
- triangles are cut out of polycarbonate (according to the size of each frame cell) and attached like a mosaic;
- Glass is inserted into the cells of the frame.
After the dome is completely sheathed, you need to check its tightness. If necessary, the joints of the slats and sheathing are additionally sealed.

Greenhouse project with beds
Internal arrangement of a geogreenhouse
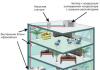
The assembly of the geodome with your own hands is completed, it’s time to arrange it inside. Before laying the beds, it is necessary to prepare heating, watering and ventilation systems. Inside the dome on the north side it is necessary to fix a shiny material (foil, metallized film) - this way the plants and water tanks will receive more light and heat.
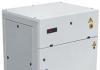
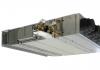
The temperature in the greenhouse is maintained using homemade heat accumulators - several barrels of water are installed under a reflective shield. The water will heat up during the day, thanks to which the required temperature will be maintained inside at night. The same water can be used for drip irrigation.

Approximate diagram of the internal structure of a geodesic greenhouse
To heat the beds, corrugated pipes can be laid under the soil layer, into which warm air will be supplied.
The pipes are covered with a layer of manure or compost. Warm air circulates through the system under the beds thanks to a fan connected to a solar panel. Additionally, to accumulate heat, several five-liter flasks, also filled with water, can be installed in the center of the greenhouse. In addition to the built-in windows, you can install an automatic ventilation system for scheduled ventilation.
The beds in the dome greenhouse are located around the perimeter.
It is better to make the width of the bed no more than 1.5 m, otherwise it will be difficult to care for the plants. Which garden bed to arrange is a matter of taste. You can build standard ones - up to 40 cm in height, tall or warm, vertical or two-tiered. If the radius of the base is large, a flower bed is usually set up in the center, on which tall or climbing crops are planted.

The beds in two tiers are well lit under a transparent arch
Naturally heated geodesic greenhouses are suitable for growing any crops from early spring to November. With a sufficiently large dome volume and the presence of additional heating and lighting, such greenhouses are suitable for year-round use even in areas with a temperate climate.
As you can see, it’s not difficult to build an original domed greenhouse on your own site. And if we take into account that the costs of its creation and maintenance are somewhat less than for other shelters, then we can safely say that the popularity of such structures will grow every year.
The geodesic dome is calculated according to a given radius (base surface area), in order to obtain:
- Estimated sizes of ribs and their number
- Number and type of connectors required
- Angle values between edges
- Required height, total building area
- Dome surface area
Dome base area calculated according to a given radius S=π *R 2 . It should be taken into account that the actual area will be somewhat smaller, due to the fact that the radius of the dome is usually calculated along the outer surface of the hemisphere (along the “vertices”), and the walls of the dome also have a certain thickness.
Geodesic dome height is determined by a given diameter, and for an even splitting frequency it can be 1/2, 1/4 of the diameter (at a high frequency it can be 1/6, 1/8). For odd - 3/8, 5/8 of diameter (etc.).
| 4V, 1/4 sphere | 4V, 1/2 sphere |
Surface area of a geodesic dome calculated using the well-known formula for calculating the area of a sphere S=4π *R 2 . For a dome equal to 1/2 of a sphere, the formula will look like S=2π *R 2 . In a more complex case, when we are talking about the area of a segment or sphere, the calculation formula is S=2π *RH, where H is the height of the segment.
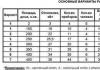
Calculation of structural elements of a geodesic domeThis can be done using ready-made tables that specify:- The number of dome ribs of the same length is ribs A, B, C, D, E, F, G, H, I. A dome with a frequency of 1V has one rib - A. A dome with a frequency of 2V has two ribs - A, B. A dome with a frequency of frequency 3V three edges - A, B, C. Etc.
- The number and type of connectors used are 4-terminal, 5-terminal, 6-terminal.
- Factors for converting the lengths of the dome ribs to the radius of the dome. For example, if you want to build a dome with a frequency of 2V, a height of 1/2 and a radius of 3.5 meters, you need to multiply the radius value (3.5) by a factor of 0.61803 to determine the length of edge A, and multiply by a factor of 0.54653 to determine the length of edge B. We get: A = 2.163 m, B = 1.912 m.
1V dome
| Ribs | Odds | Quantity |
| A | 1.05146 | 25 |
| 5-pin connector | 6 | |
| 4-pin connector | 5 | |
2V dome
| Ribs | Odds | Quantity for 1/2 |
| A | 0,61803 | 35 |
| B | 0,54653 | 30 |
| 4-pin connector | 10 | |
| 5-pin connector | 6 | |
| 6-pin connector | 10 | |
3V dome
| Ribs | Odds | Quantity for 3/8 | Quantity for 5/8 |
| A | 0,34862 | 30 | 30 |
| B | 0,40355 | 40 | 55 |
| C | 0,41241 | 50 | 80 |
| 4-pin connector | 15 | 15 | |
| 5-pin connector | 6 | 6 | |
| 6-pin connector | 25 | 40 | |
4V dome
| Ribs | Odds | Quantity for 1/2 |
| A | 0,25318 | 30 |
| B | 0,29524 | 30 |
| C | 0,29453 | 60 |
| D | 0,31287 | 70 |
| E | 0,32492 | 30 |
| F | 0,29859 | 30 |
| 4-pin connector | 20 | |
| 5-pin connector | 6 | |
| 6-pin connector | 65 | |
5V dome
| Ribs | Odds | Quantity for 5/8 |
| A | 0,19814743 | 30 |
| B | 0,23179025 | 30 |
| C | 0,22568578 | 60 |
| D | 0,24724291 | 60 |
| E | 0,25516701 | 70 |
| F | 0,24508578 | 90 |
| G | 0,26159810 | 40 |
| H | 0,23159760 | 30 |
| I | 0,24534642 | 20 |
| 4-pin connector | 25 | |
| 5-pin connector | 6 | |
| 6-pin connector | 120 | |
A type of building erected using frame-panel technology is a geodesic dome - an incredibly practical object that can perform more than one function. A similar design can be used as the basis for a country house, greenhouse, gazebo or play area for children.
- This form has great load-bearing capacity. The weight is distributed perfectly evenly - this allows you to withstand heavy loads and save on the foundation.
- Remarkable aerodynamic properties. The “streamlined” shape of the geodome increases resistance to even the most powerful air flows - in the form of destructive tornadoes and hurricanes.
- The undoubted resistance of the spherical frame to shocks and tremors allows us to recommend this type of construction for the most earthquake-prone areas.
- The cost-effectiveness of this method of creating multifunctional houses-shelters-greenhouses-sports grounds is indisputable: the surface area of the side parts is extremely minimized.
- A geodome structure is the best option for organizing a perfect system for maintaining a microclimate: hemispherical walls facilitate the circulation of an air stream.
- A dome-like object of rare beauty easily fits into an area designed according to any design criteria and is “raised” quickly even by non-professional builders.
About the disadvantages
- The flatness of the walls complicates the alignment of shelves and racks in a geodome greenhouse. In a situation with a domed roof of a home, the division of living space becomes difficult.
- During construction work, there are an abundance of joints that must be sealed and insulated separately. This is a complex process that requires certain skills and patience.
- Calculations during design are a difficult task - as is the desire for jewelry precision and beauty of the bars and triangles used when “laying out” the coating.
Preparation for construction and calculation of the geodome
If this is a greenhouse-type structure, look for an area flooded with sunlight. If you are planning to build a gazebo or an indoor sports ground, choose the shady side of the territory. If you dream of an original, unusual little house, a semi-shaded option with a closely adjacent garden would be quite appropriate.
The construction site must be cleared of hills, uneven areas, remnants of stumps and roots. In the case of a large dome, a solid base may be needed - then marking the strip foundation will become one of the preliminary stages of construction. Having outlined the boundaries of the circle, you will dig a trench and install the formwork. It is permissible to begin construction without concreting the base - if the required number of metal piles is available. Note: weak soil is an unfortunate prerequisite for such an idea.

If you are planning to use the “umbrella” being built under a transparent greenhouse, you will most likely act differently. The first phase will be the removal of soil in a circular area inside the structure. It makes sense to move the soil mass somewhere - in order to subsequently use it for planting plants in a fertile environment. The base circle is lined with non-woven material (for example, agrofibre) - this measure will not allow weeds to germinate. The flooring is covered with a thick layer of gravel.
Geometry: general and specific aspects
Another series of actions is associated with the exact calculation of the dimensions of both the dome itself and each of its constituent fragments. The most common ratio is 1:2, that is, the height of the dome structure is half the diameter of its base. The result is a regular hemisphere. The area of the bottom is calculated using the well-known formula: S = π * r 2, where r means the radius of the circle, and the stable value π is 3.14. The area of the dome itself will be 2 π * r 2.

Note: in reality, the curved part will be slightly smaller, since the frame also contains connecting beams and slats. As for determining the length of the faces of the triangles from which the hemispherical “mosaic” will be assembled, it is best to turn to Internet sites that specialize in such complex calculations. They will help to calculate both the area of a dome-hemisphere and a dome structure extended upward by ¾ of a sphere (there are also such ones: they are incredibly beautiful).
Here we present the result of the finished calculations. Definitely, the complete set of “roofing” parts of the dome with a total diameter of 4 m will include 35 large triangular tiles-plates with edge A (side length 1.23 m) and 30 smaller triangles with edge B (length 1.09 m). Remember: the number of triangle planes increases as the domed “roof” grows larger. If your gazebo house looks like a ball cut into a quarter, you will need more than 90 triangular panels. The size of the base will noticeably decrease.
Necessary elements and stages of construction
Since most often a hemispherical structure is created for “agricultural” purposes, it is advisable to consider the stages of translating into reality an idea with a greenhouse bias. We are building a dome as a room for early vegetables, fruits, flowers and other ornamental crops. This goal setting will be reflected in the choice of tools and building materials. Their range is extensive, and several design options are allowed - depending on what is already in stock and what can be purchased beyond this stock.

The frame of the greenhouse can be made of wood
Basic materials and tools:


Assembly procedure and technological nuances
- About types of coverage
Highlighting the features of the “cladding” construction group, we point out: each type of coating is good in its own way, but not without negative qualities. Polycarbonate is not perfectly transparent and overheats in hot weather, but it demonstrates excellent heat-saving properties and is convenient for installation. The film is also not super transparent, but it makes the installation process even easier. The glass does not block the path of sunlight, it is very durable. Nevertheless, it’s a bit heavy, and it’s not cheap. The best option is double glazing. Definitely expensive.
- Installation recommendations
The greenhouse “house” is mounted on a pre-installed base-floor – from bottom to top, in “rings”. The partitions are fastened with special fasteners - connectors. They can be screwed both from the outside and from the inside. From the point of view of technical skills, the process is simple, but requires accuracy. The closer the sections fit to each other, the smaller the gaps at the joints, the easier it will be to ensure the integrity of the shell in the future. On the north side, this “network” is complemented from the inside with a reflective shiny stripe.

The use of metal tube rods is permissible when constructing a geodome
At the penultimate stage of work, when the skeleton is already covered with “skin,” you will have to devote time to sealing and insulation. The ventilation system (for the hot summer period - forced) should also be thought out in advance. Several movable sections will serve as vents. It is also possible to use a door device for ventilation - sometimes it is made transformable. Since the bottom of the greenhouse “clothing” is not involved in lighting, here you can “build up” the heat-insulating side by using a series of bricks, a mound of wood chips, and sawdust.
- Interior garden problems
The design and arrangement of a greenhouse is entirely subordinated to the desire to optimize the living conditions of plants and give the room a cozy, pleasing appearance to the eye. The winner will be the one who correctly arranges the shelves with herbs and does not forget about the needs of the main “inhabitants” of the garden. It would be wise to allocate a place for the beds on the south side: there is more warmth and light there. It is advisable to “power” the fan from a solar panel mounted above the “ceiling” part of the dome. It would be nice to provide the fences of the beds with benches - “for relaxation.”

Model of the greenhouse of the future: a reasonable plan for arranging planting rows is visible inside

Domed greenhouse at the dacha: ventilating edges are visible

All that remains is to plant seedlings, bushes and flowers - and begin to enjoy contemplating the all-season riot of greenery. We hope that the dream of a home tropical park under a fabulous dome has come true, and now you have years and years of positive things ahead that give us unity with beautiful nature...