In order for the draft floor along the beams to be strong and durable enough, the repair of the base must be carried out taking into account many technological nuances. Firstly, the load that will be created on the floors should be taken into account, and secondly, the method of arranging the floor depends on the type of foundation (on soil, concrete). The article will consider the main nuances of arranging a draft base on wooden beams.
Beam device
Beams are supporting elements that are laid in the foundation of a structure at the construction stage. Some projects of private houses do not provide for the laying of beams. In this case, the repair of the draft base begins with the arrangement of brick columns - supports, on which the logs will subsequently be attached. In both cases, the difference lies only in the method of mounting the supports, all subsequent stages of work are identical.
If the repair of the base begins with the laying of beams, first of all, it is necessary to determine the degree of load created on the floor. The following indicators will depend on this parameter:
- section (thickness) of bars;
- the distance between the bars;
- type of wood used.
It is worth noting that the cross section of the material must be impressive in order to ensure sufficient rigidity of the coating. Most developers, when installing floors in modern buildings, choose logs with a cross section of at least 150 by 150 mm. In this case, the maximum distance between the beams is 70-80 cm.
It is also necessary to take into account the fact that the installation of beams in brick and wooden houses occurs in different ways. In brick buildings, logs are tightly embedded in the wall, so even at the stage of building a house, special “nests” are made in the walls for laying logs.
Base device
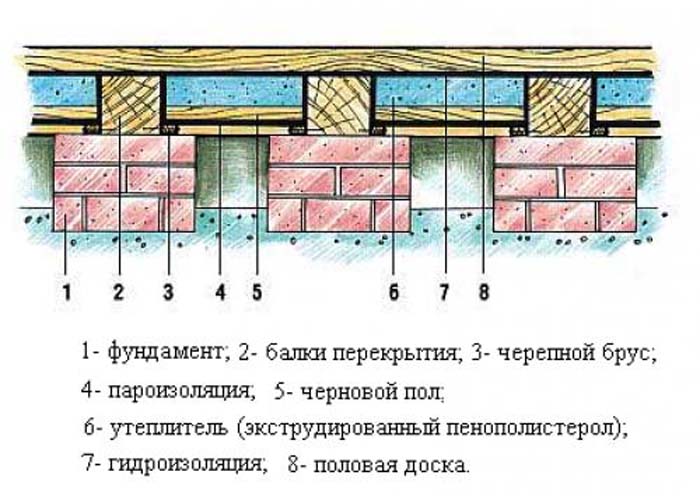
What is the layout of the draft base on the beams? The floor base is a pie, which consists of the following layers:
- Beams and / or logs. Installation of wooden elements is carried out on the foundation base or support pillars when arranging the floor on the ground;
- Skull bars. They are fixed on the bottom of the beams and serve as a support for draft boards;
- Blackboards. Sheets of plywood, OSB, chipboard and other wood-shaving materials are often used as sheathing for a wooden frame;
- Waterproofing. Coatings with water-repellent properties are laid on a layered cake as a protection of the base from moisture;
- Heat insulator. Installation of insulation involves laying the material between the beams and plywood sheets;
- Vapor barrier. Membrane coatings prevent the accumulation of condensate under the floor, which prevents the development of fungus;
- Counter rake. Installation of the counter rail ensures the presence of a technological gap under the coating, which is necessary for floor ventilation;
- Sound insulator. Sound-absorbing materials are often installed in high-rise buildings;
- Finish coating. At the final stage of the repair, the layered cake is covered with a finishing material - an array of boards, decorative plywood, parquet, etc.
It is worth noting that the base cake can also consist of fewer layers. The scheme considered above gives an idea of the possibility of laying certain materials in the process of arranging a rough foundation. The "correct" scheme of the layered pie is shown in the video.
Floor of the first floor. Arrangement features
Repair of the floor of the first floor provides for a special technology for laying the necessary materials. In most cases, the installation of beams takes place on a base, under which there is an unheated and wet basement, or even soil (strip foundation). The wooden floor is “afraid” of moisture, therefore, in the process of assembling the structure, special attention should be paid to the treatment of wood with antiseptics, as well as the waterproofing of the base.

Consider the nuances of arranging the rough foundation of the first floor of a house on a strip foundation:
- Before installing the beams and constructing the supporting pillars, the soil is rammed and covered with gravel;
- Then the gravel is poured with a layer of "lean concrete" to create a more or less rigid base for laying brick columns;
- Along the perimeter of the draft base, markings are made for supports;
- After that, brick supports are erected for laying beams;
- Then a layer of waterproofing (bituminous mastic, roofing material) is laid on the base;
- Wooden beams are fixed on the prepared supports;
- Logs are laid across the beams (the distance between them should be 50-60 cm);
- Then cranial bars are attached to the logs and sheets of plywood are laid;
- A layer of thermal insulation is laid in the cells of the wooden crate, after which the entire structure is sewn up with plywood sheets.
A more detailed process of arranging the floor of the first floor of the house can be viewed on the video.
Floor of the second floor. Arrangement nuances
Finishing the floor of the second floor of the house is technologically very different from the method described above. In this case, special attention is paid to the following points:
- revisions of laid beams;
- laying sound insulation;
- strength of the assembled structure.

Installation of the floor in most cases occurs on the logs. The tree does not create a large load on the floors, respectively, does not cause their deformation. How is the arrangement of the base of the second floor?
- If necessary, the beams of the floors are replaced with new logs;
- The nests under the bars are leveled with cement mortar so that the logs after laying are approximately at the same level;
- After that, cranial bars are fixed on the logs and sheets of plywood with a thickness of at least 5-6 mm are laid;
- Soundproofing materials are placed in the cells of the wooden crate;
- Then, a screed is poured onto the floor of the second floor for leveling, or sheets of plywood are laid;
- Between the sheets it is desirable to leave temperature gaps of 10-15 mm in case of wood expansion.
In order not to re-repair the floor of the second floor after a few years, you need to consider the following points:
- Logs and support bars must be treated with antiseptic agents before laying. In this case, the processing involves the use of high-quality products of such well-known brands as Neomid or Pinotex;
- Logs are attached to wooden floors with the help of powerful anchors and self-tapping screws;
- When replacing beams, a solution with gravel is poured into the gap between the "nests" and the beams for better fixation.
Arrangement of floors in a wooden frame

As a rule, the floor in a log house is made of wood so as not to disturb the "ecological" harmony. Logs and beams are not heat conductors, therefore they prevent heat loss in the log house. In this case, the repair of the base can be done in two ways:
- Single layer coated. In a wooden frame, the floors can be laid on logs or just thick boards. During the laying of beams, the distance between adjacent logs should be a maximum of 60 cm;
- Double coated. In this case, when finishing the base in a log house, they also lay a rough layer, which acts as a heater.
When installing a rough base in a log house, you need to consider the following points:
- The rough layer must be sufficiently rigid to serve as a reliable support for the finish coating;
- When insulating the base in a log house, it is better to use sheets of plywood, mineral wool, polystyrene, etc. as a heat insulator;
- If a screed is used in the process of arranging the floor, a ventilation gap of 15-20 mm should be maintained between the finishing and rough coating.
You can see how to put draft floors in a log house in the video below.
floating floor
A floating floor is a base laid on a structure in which there are no load-bearing beams built into the walls. In other words, the floating floor is not connected to the supporting walls in any way. A similar design is used when finishing the base in houses with strip foundations.
How to make a floating floor
- First of all, the soil is taken out of the underground;
- Then, crushed stone or gravel is backfilled;
- After ramming the gravel cushion around the perimeter of the room, supporting brick pillars are installed;
- The dimensions of the brick columns should not be less than 40 by 40 mm;
- A layer of roofing material is laid on the base for waterproofing;
- Before installing the beams, pre-treatment of the wood with an antiseptic is required;
- At the next stage, the repair involves fixing the bars, the distance between which can be a maximum of 60-70 cm;
- At the final stage, it is planned to cover the heat-insulated floor with sheets of chipboard, OSB or plywood.
How to make a floating floor, you can see in the video.


