The main advantages of a fence made of corrugated board are the relative cheapness compared to other building materials for the fence, durability, provided there is no mechanical damage, and ease of installation. Decking is a corrugated steel sheet with a protective layer, it provides noise and dust insulation, it is fireproof, and goes well with other materials.
A correctly installed do-it-yourself fence made of corrugated board will last a dozen years. The service life of some types of fence reaches 25-35 years, depending on the aggressiveness of the environment (sea wind, ammonia precipitation from the enterprise, etc.). You can make a different height of the fence, apply a different pattern to it, imitating brickwork, stone, wood and others.
Fence decking
When looking for the right fence deck, you will find that the difference between them lies in the cover material. The following types of metal profile coating are distinguished:
- polymer coating. Increases the level of protection of corrugated board and can be painted even at the production stage.
- Plastisol. It features a thicker coating layer, which provides protection not only from aggressive environments, but also from mechanical damage. This protective material provides greater durability.
It should be noted that profiled sheets also differ in thickness. A metal profile with an increased thickness is used in load-bearing structures, and a profiled sheet with a minimum thickness is suitable for a fence (the height of the ribs is about 21 mm, the thickness of the metal is up to 0.5 mm).
Observing all the above tips, do not forget about the appearance of the fence. You can choose a monotone color or different patterns.
Profiled sheet fence device
To install a fence made of profiled sheet, metal poles are used (economy option), or these are a brick column around the pipe (expensive option). The pillars are installed with the same distance (having previously removed the length of the fence and divided into equal segments) or, for example, into segments of 2.5 meters, and one segment will be obtained by the "fact".
The pillars are concreted, the concrete is allowed to gain strength (depending on weather conditions), and transverse logs (metal square or rectangular pipes) are installed by welding them to the main vertical pillars.
The last step is the installation of the profiled sheet on the transverse logs using rivets or roofing screws.

The general scheme for the construction of a simple fence made of corrugated board
All installation work can be divided into several stages, which we will consider below.
- Fence line marking.
Directly the first stage of work is marking and transferring data to a sheet of paper. The number of segments (spans) is calculated following the simple rule of installing a fence from a profiled sheet - the distance between vertical posts varies between 2.5 - 3 meters. It is very convenient to “mark” future supports with wooden pegs or pieces of reinforcement.
- Concreting of metal poles.
The height of the posts depends on the planned height of the fence. For fences of a standard height of 2 m, use a concreting depth of 100-110 cm below the soil surface, for higher fences, respectively, we increase the depth of concreting, and for low fences - lower it.
Digging a hole. it is necessary to start knitting a skeleton from reinforcement under concrete (it will increase the durability of concrete). Next, we prepare concrete - 1 part of cement to 3 parts of sand and 4-5 parts of gravel or slag, water. We fill the pits with supports with concrete, after checking them with a building level from all sides and fixing them so that they do not move when pouring, although experts always double-check the metal poles with a building level after pouring.
Depending on weather conditions, concrete needs to gain strength within three days (in case of heat, moisten concrete with water every day, this will give additional strength, and in case of rain and cold, this period must be increased by 1-2 days).
- Mounting transverse log.
The next is the installation of transverse square or rectangular pipes. This is done using a welding machine by "welding" the transverse logs to the vertical posts. On a two-meter fence, grab two transverse logs. Welding areas should be coated with primer paint to provide protection against corrosion.
- Fixing profiled sheets.
The final stage of the installation of the fence is the fastening of profiled sheets. Sheets are installed with an "overlap" on an adjacent sheet in one wave. They are attached to the transverse lags with the help of roofing screws. It is also necessary to leave a small gap at the bottom of the sheet - from 5 to 10 cm, in order to enable snow and rainfall not to accumulate and to be blown by the wind.

Necessary materials for the fence
Before direct installation of the fence, it is necessary to calculate all the necessary materials. The most important material is a profiled metal sheet that fills the main area of \u200b\u200bthe fence.

Specialists in installing a fence from a profiled sheet recommend using a sheet with C18 or C21 encoding.
Next, stock up on metal poles for vertical installation. These can be square pipes 60 * 60 or 40 * 40 mm, or round pipes with the same diameters.
You will also need metal transverse logs (rectangular pipes measuring 40 * 20 mm) to give the main rigidity and strength. Profiled sheets will be installed on them.
Of the tools during the installation work, it will be necessary to use the following:
- Shovel and crowbar - for earthworks.
- Bulgarian with a cutting disc - for cutting fittings and pipes.
- Concrete mixer, buckets - preparation and pouring of concrete.
- Brushes - for painting metal pipes.
- Drill or screwdriver - for attaching a profiled sheet to transverse metal lags.
Also needed in the work - a building level, a coil of rope or string (for marking), a tape measure, a pencil, gloves and a variety of consumables (cutting discs, electrodes, etc.).
Preparation of metal for installation
The durability of paint and varnish coatings applied to the metal surface depends on the correct preliminary preparation of the metal surface for painting. The service life directly depends on the condition of the metal before painting. Therefore, if metal pipes are stale in the warehouse and covered with a small layer of corrosion, it is necessary to remove it.
There are two types of metal preparation for painting:
- Primary preparation. This preparation is carried out to remove scale, dirt and rust, until bare steel remains.
- Secondary preparation. Surface preparation leaving firmly bonded parts of organic and metallic coatings.
After these stages of preparation, it is necessary to degrease (white spirit, gasoline or acetone) the metal surface for painting, then apply a primer layer. After drying the primer layer of paint, apply one or more layers, depending on the aggressiveness of the environment.
After installing vertical poles and metal transverse logs, it is necessary to knock off all scale and slag after the welding machine, and paint over the welding spots in one or more layers.
The order of installation of supports (pillars)
After all the metal supports are prepared (cut and painted), it is necessary to proceed with their installation. Let's describe this process step by step:
- Territory marking. We divide into segments, insert the pegs and pull the tourniquet.
- Digging holes. With a shovel and crowbar or with a manual (electric) drill.
- Pillow under concrete. At the bottom of the pit we fall asleep a pillow of sand and gravel, then we ram it.
- Pole installation. We install the support and align it in level and plumb.
- Pouring concrete. We pour the concrete solution and fix the column in level with the help of boards and auxiliary material.
We accurately install fence posts made of corrugated board, since it is they who ensure the strength and durability of the entire structure. At this stage, you should not rush, because it is better to spend a little more time now than in a few years to fix, or even completely redo the fence.
Installation of metal transverse logs (jumpers)
The installation of jumpers is carried out using bolted connections or clamps (a relatively old method) or using a welding machine, which is currently one of the most reliable and fastest methods.
Specialists in the installation of fences of this type recommend fixing the logs at a height of 25-30 cm from the surface of the foundation or the ground, and at the same distance from the proposed top of the fence. In this way, optimum structural strength is achieved.
Advice. If you make spans of the fence 3 m long, then with a length of transverse logs of 6 m, the minimum amount of remnants of a metal tube will come out, since the length of the log will be enough for just two spans.

Installation of profiled sheets on the structure skeleton
After completing the main labor-intensive work, it remains to attach the profiled sheet. The easiest way is to fix the sheets to the transverse joists using self-tapping screws (roofing screws). Thanks to the special tip of the self-tapping screw, he himself drills a threaded hole with a drill or screwdriver.
When screwing screws, it is important to remember:
- A loose self-tapping screw will later cause leakage with a trace of corrosion.
- A strongly twisted self-tapping screw causes deformation of the profile sheet.
- A crookedly screwed self-tapping screw violates the integrity of the metal and creates a loose fit of the gasket, which causes corrosion.
A properly screwed self-tapping screw is considered to be screwed in at an angle of 90 degrees with pressure that does not allow overtightening or deformation. Self-tapping screws are screwed into every third wave.
Prices for corrugated fences with installation
The cost of a profiled sheet fence depends on the thickness of the metal, the presence of a colored polymer coating on one or both sides, the length and height of the fence. Also, the price depends on the method of concreting and the foundation under the fence, the presence of additional elements in the structure (gate, gate, brick pillars, etc.).
Here are some of the approximate prices for various types of profiled sheet fence (at a height of 2 m with local concreting of vertical pipes):
- A fence made of galvanized corrugated board - about 1400 rubles per 1 linear meter.
- A fence made of profiled sheet with a polymer coating on one side - from 1600 rubles per 1 linear meter.
- A fence made of profiled sheet with a polymer coating on both sides - from 1800 rubles per 1 linear meter.
In addition to installing the fence itself, you need to take care of the entrances and entrances to the territory. Prices for some additional installations of related works:
- A gate made of profiled sheet (width up to 100 cm) with handles, a lock and a latch - about 5,000 rubles (manufacturing and installation).
- Swing gates (from 3-4 meters) with latches and hinges - 10,000 rubles.
- Brick pillars in one and a half bricks - 8000 rubles / pillar.
Despite the fact that you can install the fence on your own, it will take a lot of time and effort, so it is often more profitable to order the fence installation from professionals.
Fences for home and summer cottages from corrugated board: which type is better to choose?
Fence options from corrugated board can be divided into metal and combined. The fences combined from a professional flooring include several different materials.
Metal fence made of corrugated boardThe simplest and least expensive. Sheets of corrugated board are fixed on a metal frame and form a continuous tape. Perfect for cottages and gardens. |
 |
Sectional or modular fences made of corrugated boardEach sheet is framed by a rectangular or figured metal frame. Sections are welded to metal poles using tapes. The fence looks neater and more finished than the usual metal one. |
 |
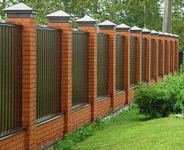
Brick fence with corrugated boardA more expensive and time-consuming option, but it looks very solid. Sheets are fixed between square pillars lined with decorative bricks. |
 |
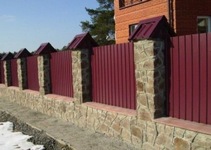
Fences made of stone and corrugated boardSheets are placed between concrete pillars trimmed with stone. You can also decorate a concrete foundation with a stone. |
 |
Fences from a professional flooring with forgingVery nice decorative fence. The sheet is framed with a frame with elements of artistic forging. Each section is installed between brick, concrete poles or metal poles. |
 |
Attention! When building a fence from corrugated board with your own hands, you should not take on combined options if you do not have the skills to fill a strip foundation and lay bricks, as well as with a limited budget.
Cooking Tools

To build a fence from corrugated board, you will need the following tools:
- tape measure (at least 3 meters);
- pit drill (manual - for light soil, gasoline - for heavy soil);
- sledgehammer;
- level;
- cord;
- welding machine;
- drill or screwdriver with a hex bit.
Attention: work with the welding machine requires special training. If you do not have the skills, it is better to invite a professional. You can also use the installation technology corrugated board fence without welding! Most reliably, the logs are fastened to the poles using galvanized clamps, which are tightened with self-tapping screws.
What accessories for a corrugated fence do we need?
1. Sheets of corrugated board for the fence
What is the best fencing decking to buy? In terms of size, everything is simple:
- fence up to 2 meters - you can buy a corrugated fence with a corrugation height of 8 to 21 mm (C8, C10, C20, C21)
- a fence over 2 meters and with increased wind load - a corrugation height of at least 20 mm (C20, C21).
Thickness corrugated board for the fence - at least 0.5 mm.
Width corrugated board for the fence depends on the height of the corrugation.
Height corrugated board for the fence - standard - 2 meters, the most running range - 1.8 - 2.2 meters.
It remains to decide type of corrugated board. Practice has shown that the best option - double sided fence board- galvanized sheet with double-sided polymer coating. Such a fence will look great from any side and with careful handling will serve you for many years.

Take note! The design of a fence made of corrugated board can be made quite interesting. Today fences from a professional flooring under a stone and a tree gain popularity.

2. Corrugated fence posts
Round or shaped (rectangular) pipes are used as pillars. They are available with or without paint. If you want to build a cheap corrugated fence, you can use used pipes, but without corrosion.

Options:
Thickness metal for poles 2-3 mm (second-hand pipes - 2.5-3.5 mm).
Diameter round pipe for a corrugated fence - 5-7 cm.
cross section profile pipe - 4*6 or 6*6
Height pipes - fence height from the ground + 50%
3. Cross lags
The logs are attached to the posts and will serve as the base for the corrugated fence sheets. Usually they use a profile pipe 40 * 20 or 40 * 25, with a metal thickness of 1.5 mm or more.
 4.
fasteners
4.
fasteners
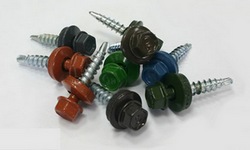
Most often, galvanized self-tapping screws are used for corrugated boarding on the fence. They have a rubber gasket for a tight connection, and a polymer coating is applied to the top to match the color of the sheet. The most popular size of self-tapping screws for the fence is 5.5x19 mm. With such a length, the sharp end remains inside the profile pipe of the log.
We calculate the fence from corrugated board
For a simple metal fence made of corrugated board material calculation is performed as follows.
Number of sheets = fence length: useful sheet width + 1-2 spare sheets.
Number of poles = fence length: distance between poles + 1.
Attention! The length of the gate and gate is not included in the length of the fence. They also need sheets and poles. The gate frame and wickets are easier to make to order.
The number of lags \u003d (the number of columns - 1) * 2 (if the transverse lag is 3, then we multiply by 3).
Number of screws = number of sheets * 6 (to increase the strength, the number of screws can be increased).

Materials have been purchased. It's time to learn how to make a corrugated fence.
Installation of a fence from corrugated board in 5 steps
1 step. Clearing
The place for the fence is cleared to the ground. If possible, the ground should be leveled.
2 step. markup
We drill holes at the corners of the fence, we set the posts strictly vertically in them. You can check the accuracy of the vertical with a level or plumb line. Between them we stretch the cord-twine in 2 rows (it is better to keep the vertical). Along this line we will install the remaining pillars. It also allows the pillars to be at the same level (in the absence of terrain slopes).

3 step. Pole installation
Along the line of the cord at regular intervals (standard 2.5 or 3 meters), it is necessary to drill cylindrical holes for the posts. With a fence height of 2 meters, the depth of the holes is 1 meter. The most important question when installing a fence from corrugated board, what is the best way to fix the poles?
 1 way
1 way
Driving with a sledgehammer into the ground. Suitable for light fences, which are placed on fairly solid ground. Here, the diameter of the drilled hole should be slightly smaller than the diameter of the pipe.
2 way
Partial concreting. The most optimal solution for giving. The column is set according to the level, then it is covered with earth on ½ or ⅔ of the pit, tightly compacted. The remaining space is filled with concrete. For hardening, instead of earth, you can use a mixture of crushed stone with sand.
3 way
Butovanie. Instead of concrete, the hole is filled with small gravel, which is compacted with a vibrating plate. This method prevents the pillars from sticking out on clay soils, which occurs when internal waters freeze.
4 way
Complete concreting. Suitable for light soils. The entire hole around the post is filled with concrete. A pillow of crushed stone and sand in this case also does not hurt

Helpful advice. With a high level of groundwater, waterproofing of the hole is required. It can be done by laying the walls and bottom with roofing material.
Other installation methods are considered time-consuming and costly. They are suitable for capital fences of country houses. These include the installation of a strip foundation for a fence made of corrugated board, as well as the installation of a fence made of corrugated board on screw piles.
4 step. Installation of transverse logs
The logs are welded perpendicular to the posts. Mounting points are pre-measured.
Attention! The distance from the log to the edge of the sheet should be 20 cm.


After welding, it is necessary to carefully clean the seams and apply paint to them, otherwise corrosion cannot be avoided. If you decide to install a corrugated fence without welding, galvanized clamps will not require painting and will create additional protection.
5 step. Fastening corrugated board to the fence
 The sheet of corrugated board is fixed on two logs with the help of self-tapping screws. Work must be done together, protecting hands with construction gloves (the edges of the sheets are quite sharp). We fasten the sheets from the gate or gate from the outside. First you need to draw a straight line with chalk along which the screws will be screwed. On one sheet, 4 self-tapping screws are located on one log. The extreme ones overlap adjacent sheets at the same time.
Watch the video on the installation of corrugated board, which tells in detail about the fastening of sheets.
Tip: The top line of the fence can be strengthened and decorated with a U-shaped plank. It will give the fence a finished look. You can use contrasting colors.

So, your corrugated fence is ready.
It remains to clean it and enjoy the work that you did with your own hands. We also invite you to watch a video where the gate construction process is shown inside and out.
More recently, profiled sheets were a fairly simple and nondescript material. Made of galvanized sheet, they were used to cover the roof of manufacturing plants, small outbuildings, hangars and garages, as well as for erection around construction sites. But that's all in the past.
The fence from a professional flooring combines quality and cheapness.
Manufacturers tried to bring corrugated board to a higher level, for which they approached the process of its manufacture with imagination and greatly improved its quality characteristics.
And today corrugated board is a completely new material, which is based on the same galvanized metal sheet, but its external data has become much more attractive. For example, the last variety, the upper side of which began to be covered with a layer of polymer.
Thus, the manufacturers solved two problems at once:
- Enhanced protective properties.
- We created a material that has excellent external data in terms of color design.
Therefore, at present, many developers with great pleasure began to use corrugated board not only to cover the roofs of their country houses, summer cottages and outbuildings, but also for.
And, as practice has shown, the construction of a corrugated fence is so simple that even a non-professional can handle it.
In addition, it should be noted that the fence device from is cheap. And today, the financial indicator for many plays a more important role than all the others.
But, as in any construction process, it is necessary to accurately calculate everything, prepare well, without missing a single detail, and only after that proceed to the process itself. And one more very important addition: it is necessary to strictly adhere to all stages of erecting fences from corrugated board with your own hands.
Calculation of the necessary materials

In order to professionally from corrugated board with your own hands, the following materials are needed:
- profiled sheets. It is necessary to immediately make a reservation that corrugated board is divided into two categories: roofing and fencing. Although both of them can be interchanged. So for fences, it is best to use material whose crest does not exceed 21 millimeters;
- racks. Here you can use various options. For example, brick or stone pillars, logs, pipes of various section shapes, metal profiles, and so on. Since the conversation is about do-it-yourself corrugated board, you will have to choose the simplest option. These are pipe poles. Their installation is simple, the price is low. It is best to choose round pipes with a diameter of 59 mm or square pipes with dimensions of 60x60 mm;
- transverse beams. Rectangular metal pipes with dimensions of 60x25 mm are also used here. Mandatory condition: the wall thickness of such a pipe should not exceed two millimeters;
- self-tapping screws for metal;
- paint for painting poles and lag is selected in the color of profiled sheets;
- cement and gravel.
Now everything needs to be accurately calculated. Let's start with corrugated board. To do this, you will have to decide how high your fence will be. Please note that profiled sheets are made in lengths of 12 meters. Therefore, you will have to cut them into multiple pieces so that there is no waste. Ideally, this is 1.5 m, 2 m, 3 m, 4 m and so on.
For example, we choose a two-meter fence. Next, you will have to calculate the perimeter of the area that will be fenced. The width of the sheet is known, the height of the fence is also known, it remains to make a few mathematical calculations, and you will know exactly the required amount of corrugated board.
There is a small nuance. From the total number, you will have to subtract the dimensions of the gate and the gate, if it is located outside the gate.
Now we count the number of columns and their size. The height of the fence is 2 m, but this is only its outer part, and the installation of the pillars will have to be done in the ground. So the underground part of the pillars should be from the outer 30%. In our case, 70 cm. This means that the length of each metal rack is 2.7 m.

Now the number of columns. Here you need a diagram of the site and the value of its perimeter. The best option is when the pillars under will be located at a distance of 2-2.5 meters from each other.
The number of transverse lags is determined again on the basis of the site layout and its perimeter. There is one subtlety here. If the height of the fence exceeds 2 m, then the lag is installed in three rows, if less, then in two. The number of screws is determined simply.
One sheet will require either six or nine pieces. It all depends on the amount of lag. The remaining materials are calculated according to SNiPs.
How to make a fence from corrugated board: construction stages
Stage number 1 - earthworks. You have already decided on the distance between the racks. The countdown will start from the goal post. If they are already standing, then the first hole will have to be dug near them. You can dig with shovels, but this is a laborious process. It is best to use a garden drill.
After each open hole, we measure the distance and dig another. It is better to drill a well a little deeper. Gravel will have to be poured into it and tamped. It will act as a pillow.

Stage number 2 - we prepare a concrete solution. There is no need to do it on a large scale. You can limit yourself to small batches, which would be enough for concreting several wells. Mortar formulation: one part of M400 cement, four parts of gravel.
Stage No. 3 - installation of racks in wells and concreting. Posts must be set vertically. The poured concrete must be bayoneted using tools or improvised materials. This is a prerequisite. In the process of bayoneting, the air that remains in the body of the solution is released.
Attention! Before starting the installation of the rack must be painted.
Stage number 4 - installation of transverse logs. This stage is best started a few days after the installation of all with your own hands. The concrete mortar must dry.
Now to the process itself. Here you can use two options for attaching the log to the racks. The first is with the help of electric welding. This is the easiest process, and also a very reliable mount, but it will only be beneficial to you if you yourself have the skills to work with a welding machine.
If not, then you will have to invite a professional who will have to be paid. Yes, and the very construction of a fence from corrugated board with your own hands goes into the category with the use of outside help.
The second way, where you can use a bolted connection. That is, through holes are drilled in the logs and in the racks, these two elements are connected with a bolt and a nut, and preferably with two nuts.
Attention! The installation of transverse logs is carried out at a distance of at least 20 centimeters from the upper edge of the column and from the ground. After installation, the lags need to be painted.
Stage number 5 - installation of profiled sheets. This process starts from the gate. Each sheet is set vertically with a level. They must be fastened with self-tapping screws using an electric screwdriver. Two fasteners on the edges, one in the middle for each log. Each subsequent sheet is overlapped by one wave.
In principle, on this it would be possible to complete the construction of a fence from corrugated board with your own hands. But there are a few more nuances.
How to make a fence: additions

First. The upper open edges of the uprights must be covered. Here you can use decorative elements in the form of balls, peaks and so on. Their production is carried out by a large number of workshops. The choice is huge.
Second. Under the profiled sheets, it is possible to remove part of the soil and carry out concreting in the form of a strip, creating a small blind area towards the street from the outside and towards the site from the inside.
Third. The construction of the fence must strictly comply with all norms and requirements for the design of the site as a whole. That is, the correspondence of the gate and the fence, the main house and the fence, outbuildings and the fence. Everything should be united by one landscape design concept. By the way, more and more often designers offer to make gates and fences from the same material.
Fourth. The scheme and must strictly obey all the norms and requirements of modernity.
Important! No self-activity and saving building materials. A temporary approach to this structure is unacceptable, everything is solid, everything is for centuries.
Conclusion
From the foregoing, a fairly simple conclusion can be drawn. If you decide to build a fence from corrugated board yourself, without attracting qualified outside help, then you should know that the device and design of the fence are quite simple.
You could see for yourself. But approach its construction with a great deal of responsibility.
Please note that a small mistake or neglect of one of the steps can cause the fence to skew after a while. You will lose not only money for its repair or restoration, but also a lot of nerves.
If you decide to put up a fence from corrugated board with your own hands, then this review is for you. It describes in detail and clearly all the nuances of the workflow. You just need to repeat all the steps - and the result will be no worse than that of professional builders.

How to organize work
To get a good result, it is not enough to understand only the features of installing a corrugated fence. It is necessary to choose high-quality materials, use the right tool and build a solid supporting structure. We will walk you through the process from start to finish so you don't have any questions.

Preparatory activities
Going to buy materials right away is not the best solution. Since you do not know the exact amount, and even a professional will not make calculations by eye.
Therefore, do not be lazy and spend half an hour to take measurements and calculations:
- First of all, the location of the fence is determined. A construction cord is pulled along the line, which will serve as the main guideline. Wooden pegs or metal elements are hammered in the corners, on which a cord or fishing line is attached;

- Length measurements are taken. First of all, it is worth clarifying the length of the fence. Everything is simple here, for work you need to attract an assistant and use a tape measure to take all the measurements;

- The spacing of the columns is determined. It can be anything, but most often the range is from 2 to 3 meters, 2.5 meters is the most popular and convenient solution. It is best to immediately mark the position of the supports, so you can accurately calculate the required number of columns;
- The required volume of the profiled sheet is calculated. Everything is simple here, if you know the dimensions of the sheets of corrugated board. The standard width is 1155 mm, while the useful one is 1100 mm. Height can be any, you will cut the material with an accuracy of up to a centimeter.

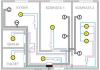
If you have an uneven landscape, then you should design the fence to compensate for all level differences. In this case, a strip foundation is necessarily made, with the help of which all irregularities are closed. Below is an example project for an uneven area.

Materials and tools

Even perfect compliance with the installation technology does not guarantee the reliability of the fence if you used low-quality materials. Therefore, you need to choose everything you need very carefully. The table below will help you make the right decision.

| Material | Selection Guide |
| Decking | It is best to use options with a wave height of 8-10 mm, they are marked as C8 and C10, respectively. The thickness of the material should be 0.5 mm or more, I do not recommend taking thinner sheets. When buying, pay attention to the quality of painting: the surface must be perfect, without marriage and scratches |
| columns | The most commonly used profiled pipe with a size of 50x50 mm or more. The length of the supports depends on the height of the fence, if this figure is 2 meters, then the pole must be 3 meters for reliable fastening in the ground. It is easier to buy ready-made posts, their price is higher, but you get a ready-made version that does not need to be painted and cut |
| Jumpers | They are best made from a light and durable pipe 40x20 mm. For the convenience of fastening the profiled sheet, choose products with a wall of 1.5 mm. With this thickness, you can drive self-tapping screws without drilling holes, which speeds up and simplifies the workflow. |
| fasteners | Decking is best fixed with roofing screws. They are painted in the color of the main coating and have a drill tip for screwing into metal without pre-drilling. Also in the product there is a washer with a rubberized base, which closes the hole and protects it from moisture penetration. |
| Materials for concreting | To fix the pillars, you will need either concrete from cement, sand and crushed stone, or a cement-sand mortar and filler from stone, brick and broken concrete. The second option is easier and cheaper, since stones and old bricks can be found almost for free. |
| Dye | Required for painting poles and lintels. Use either primer and paint, or a composition that combines these components |

Do-it-yourself installation of a fence from corrugated board requires you to have a certain set of tools:
- Welding machine for attaching veins to poles. Suitable mobile household option, powered by a network of 220 volts. If you do not know how to cook, then it is easier to attract a welder for an hour or two. In this case, you need to pre-prepare and markup, so as not to waste time and get the job done quickly;
- Bulgarian for cutting metal and stripping it before welding. This tool allows you to quickly and accurately cut the pipe, clean the welds and prepare the surface for welding. Do not forget to stock up on cutting and grinding discs of the appropriate diameter;

- Use metal shears to cut corrugated board. In no case do not work with a grinder, this causes the profiled sheet to overheat and after a year the ends begin to rust;

- To dig holes under the pillars, a shovel or a special drill with a diameter of at least 20 cm is used;
- The solution is prepared either manually (in this case, you will need a large capacity), or using a concrete mixer. The second option is preferable for large volumes of work. It is not necessary to buy equipment, you can rent it for 1 day;
- Measurements are made using a tape measure, marking is best done with a felt-tip pen. It is most convenient to control the position of the pillars and profiled sheet with a building level;
- Sheets are fastened using a screwdriver with a special M8 nozzle. It is sold in hardware stores and is designed specifically for roofing screws, the magnetic holder allows you not to lose fasteners during operation.

Installation of poles and fastening of veins
Installation of a fence from corrugated board begins with the installation of posts.
The process consists of the following steps:
- Digging or drilling holes for poles. The work is done with a shovel or a drill, the minimum depth of the supports should be at least 1 meter. In addition, a pillow of sand or gravel is poured on the bottom with a layer of 10-20 cm, this nuance should not be forgotten either. The total depth is usually 120-140 cm;

- A pillow is poured at the bottom. It will ensure the stability of the installation and will not allow the column to sag during concreting;
- The column is put in place. First of all, the height of its aerial part is checked, if necessary, the position is adjusted. If the support is low, then sand is added, if it is high, then the column gently deepens;
For reliability, protrusions and lintels can be welded to the underground part. Then, when concreting, the column will be fixed much more firmly.

- If a filler of stones and bricks is used, then the pit is filled to 2/3 of the depth. The rest must be laid after the initial pouring of the solution, when it fills all the voids. The stones are carefully rammed, while the position of the column is constantly checked with the help of a level, it must be level;

- Preparing a solution. If you do not have a filler, then cement, sand and gravel are mixed in a ratio of 1: 3: 5, while the consistency should be quite thick. If you use stones or bricks, then a semi-liquid mortar is prepared from 1 part cement and 3 parts sand. The solution must penetrate into all voids and fill them for the best fastening;
- Pillars are being concreted. The solution is poured into the pits and compacted with a stick or reinforcement so that it fills the pit as best as possible, and there are no voids left in it. The solution with crushed stone is poured to the top, and if you used stones, then at the first stage they must be closed, after which the filler is added to the very top and filled with mortar to the desired level;

- Checking the position of elements. I know from my own experience that even with careful pouring, the column can move. Therefore, immediately after concreting, check its position with a level on all sides and, if necessary, level it. Only after that the work can be considered successfully completed.

For concrete to gain strength, it needs time. It is best to continue work no earlier than 5 days after concreting, during which time the material will set well and harden.

The technology for installing a fence from corrugated board with your own hands includes such a stage as fastening the veins. This part of the work can be done in two ways: by welding and using special brackets.
Consider each of them and start with welding:
- Jumpers and poles are being prepared. As for the veins, they are cut into pieces, which should be 5 mm less than the distance between the posts. The surface of the poles at the point of attachment of the jumpers is cleaned, if they are painted, then removed;
- The veins are exposed and welded. If you have clamps, then the easiest way is to fix the jumpers with their help, if there are no fasteners, then two assistants should hold the element until it is grabbed. Welding is carried out along the entire perimeter of the junction;

- After welding, the seams are cleaned. Too protruding influxes and other flaws are removed. If poorly welded areas are found, they must be welded again;
- Surface cleaned and painted. If you had painted posts, then only the joints and veins are painted. If there is no coating, then the processing is carried out in its entirety. The application of the protective composition is carried out in at least two layers, special attention is paid to the places of welding and other joints.

Now we will analyze the option of connecting the pillars and the log using special brackets. How they look can be seen in the photo, and how to use them, we will analyze below:

- The first element is set at the level you need. Mounting to the pole is carried out using self-tapping screws. Fastening can be done on the sides or from the front, it all depends on the design of the fastening unit;
- The bracket is placed on the second pole. To accurately determine its position, you need to put a jumper and put a building level on it. It determines the exact location of the mount, and it is screwed to the support. In the same way, work continues along the entire length of the fence;

- Jumpers are fixed with self-tapping screws on the back side. It turns out a very strong and perfectly even knot. The only downside to this solution is that fasteners are not available in all cities, so if you decide to use this technology, then make sure you can buy brackets.

Fastening of corrugated board
Installation of corrugated board on the fence is carried out according to the following scheme:

- First of all, a sheet is prepared. If cutting is needed, then marking is made and the element is cut. If there is a protective film on the surface, then it is better to remove it before fastening, since then it will be very difficult to tear it out from under the screws, and pieces of polyethylene sticking out from under the washers will spoil the whole view of the fence;
You also need to know how to properly fix the elements with self-tapping screws. Here you should be guided by the rubber base of the washer, it should not be crushed, but it should not just touch the surface. The correct option is shown in a simple and understandable picture below.

- The sheet is placed in the required position and tacked. To begin with, it is enough to tighten 4 self-tapping screws in the corners so that you do not need to hold the element. Next, the profiled sheet is attached as expected, the hardware should be located after 1 wave, their length is usually 20-25 mm;

- The following sheets are attached in the same way.. Do not forget to check the position of each element with a level, many people forget about this after mounting the first sheet, and as a result, a noticeable skew forms at the end of the fence;

- Fence bar attached. It is needed in order to give the structure a more attractive look and close the upper ends from precipitation. The elements are simply put on the upper part, at the points of their connections an overlap of at least 30 mm is made. Fastening is done with the help of rivets, which are matched to the color of the fence, everything is simple and fast.

Installing a corrugated fence according to this review is not difficult. If you are interested in the issue of assembling gates and gates, then the process is similar to that described above with the only difference being that you need to weld the frames and fasten them to the posts on hinges. This type of work is described in detail in a separate review on our website.
Conclusion
After reading the review, anyone can handle the work, especially since you yourself choose the options for assembling the structure. The video in this article will help you understand the topic even better and will clearly show many important points of editing. If you still have questions, then write them in the comments below.
Every summer resident or owner of a private house faces the problem of installing a new fence. Everyone wants it to be beautiful, reliable, do not require subsequent maintenance and suit the price. The listed requirements are met by corrugated board (or profiled sheet) - painted (less often galvanized) or corrugated thin-walled steel sheet coated with polymeric materials. Almost every man can install a fence from corrugated board with his own hands, without involving third-party specialists.
Which corrugated board to choose for the fence
The modern market offers a diverse range of profiled sheets, which is divided into three conditional groups:
- C - with a wave height of 8-44 mm. These products are used in the installation of walls, facades and barriers, which include fences.
- Group H is intended for roofing. Such a profiled sheet has increased bending rigidity due to a high (more than 44 mm) wave and a special capillary groove for water drainage.
- NS - universal corrugated board with a wave height of 35 to 44 mm for various purposes.
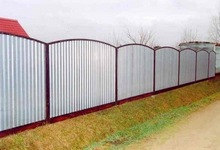
Simple fence made of corrugated board
The width of the corrugated board is 980-850 mm, it depends on the size of the rolled steel used and the profile of the wave. According to the standards, the thickness of the steel profiled sheet is 0.45-1 mm (taking into account the tolerance, it can be 0.39 mm). The height of the finished sheet is 1.0 m and then after 0.5 m. Directly from the manufacturer, you can order a sheet of any size up to 6 m long.

Types of profiled sheet and their application
The corrugated board coating is multilayer (except for the cheapest option with a single layer of zinc) and is conventionally divided into three groups:
- Zinc coating is the cheapest, with a minimum service life.
- Aluminum-zinc coated with a mixture of zinc and aluminum with improved characteristics.
- Polymer coating - the most relevant, consisting of:
- polyester with a matte or glossy structure for use in medium temperature ranges;
- pural (a mixture of polyurethane and polyamide) with increased resistance to ultraviolet;
- plastisol based on polyvinyl chloride (PVC) for use in difficult climatic conditions;
- certain types of composites.
The color scale is presented very widely. From well-known manufacturers (for example, Ruukki), the color of the coating can be ordered from the RAL and RR catalogs. The profiled sheet with prints imitating wood, stone or brickwork looks interesting.

Wood fencing


"Brick" metal fence
The parameters described above affect the appearance of the fence, its service life (from 20 years and above) and differ significantly in price. To make a fence from a profiled sheet with your own hands, it is important to choose an acceptable combination of price and quality of the material. Experts consider the corrugated board with a polymer coating of grades SP10 and SP20 to be optimal for fences.

The technology of installing fences from corrugated board
You can hire specialists, but it is quite realistic to make a fence from a profiled sheet with your own hands with metal pipe racks. This task does not require supernatural skills and rare tools, and you can save from 20 to 50% of the cost of the material - that's how much the work costs.

Scheme of the fence on the racks
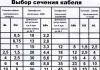
Calculation of profiled sheets and racks for building a fence
To determine the amount of corrugated board, it should be remembered that each sheet is overlapped by the next, and the useful width of the sheet is 40-80 mm less than the real one. The height is selected depending on the wishes and the availability of the foundation.
As a log (lintels) for attaching a profiled sheet, a profile pipe 40 * 20 mm is used. It is believed that when using the SP20 profile, two logs are required with a fence height of up to 2 m and three with a higher height. The optimal distance from the lags to the edge of the profiled sheet is 300 mm.

Racks (supports) for the supporting structure can be made of various materials. It is better to use a square metal pipe with a side of 60 mm and above. The distance between the racks is 2-2.5 meters. To calculate the number of racks you need:
- Measure the length of the fence, then divide by 2.5.
- The resulting number is rounded up (the total number of racks, taking into account the corners, is 2 more).
- Calculate the height of the supports, taking into account the fact that 30-40% of the length should be in the ground. Therefore, for a fence 2 meters high, the length of the rack will be: 2 + 0.35 * 2 = 2.7 m (approximately).

Racks from a profile pipe with a heel
Fasteners and strips for ends
The number of fasteners (self-tapping screws or rivets) is calculated taking into account the fact that two extreme waves of the sheet are attached to the lags and the middle ones through one. That is, one sheet of SP20 is attached at six points. Rivets (the most common 4*20 mm) and self-tapping screws (preferably 4*25 mm) come in different colors, which allows you to choose them to match the fence. It is preferable to use self-tapping screws with rubber-coated washers, this prevents damage to the profiled sheet during installation and loosening during operation.

Decorative U-shaped plank serves to frame the end of the fence, gives a finished look and protects the profiled sheet from rust. It is better to use a bar with rolled edges - it is stronger and does not damage the coating during installation. The length of the slats is 2 m, they are installed overlapping each other (30-50 mm) along the entire length of the fence.

Decorative U-shaped plank
It is useful to purchase an aerosol can with paint of the appropriate color to eliminate possible scratches and scuffs on the profiled sheet. To protect the supporting frame, you will need primer and paint (preferably neutral gray in the background of the reverse side of the fence).
To prepare a concrete solution, sand, crushed stone, cement will be needed in the required quantities (in the transitional period of the year - a plasticizer).
Construction tool kit
To install a fence from corrugated board with your own hands, you will need the following tools:
- drill and shovel for digging holes for racks;
- concrete mixer;
- angle grinder ("Bulgarian");
- a welding machine for attaching the log to the racks (there are other mounting options, but you should not consider them due to complexity and unreliability);
- drill or screwdriver;
- riveter (when using rivets);
- metal scissors;
- painting tool (for painting the frame);
- measuring tool (tape measure, thread, bubble and hydro level).
In no case should you neglect the requirements of labor protection! Protective goggles and comfortable work clothes are required when working with power tools. Use a protective shield when welding. The profiled sheet itself is very sharp and you need to work with it with gloves.

Work in protective clothing
Technology for installing frame racks
To understand how to properly install a corrugated fence with your own hands, you should understand the principles of mounting the supporting structure. The initial stages of the construction of the frame are its marking, binding to the terrain, determining the type of soil and choosing the method of installing racks.

- Install end and corner posts first. They must be at the same height, which is controlled by the hydraulic level. If the length of the level is not enough, you need to use any intermediate pole or support.
- Racks can simply be hammered into the ground, but it is better to concrete them. To facilitate the alignment of the posts in height, the bottom of the prepared pits is covered with gravel or sand, and it is better to equip the rack itself with a heel - a flat platform that facilitates installation.
- It is mandatory to check the verticality of the racks with a bubble level during and after installation.
- Concrete on top of the ground is better to cone to drain water and prevent it from accumulating at the base of the post.
- If the length between the extreme racks is divided by the number of intermediate ones, the exact distance between the centers will be obtained.
- After the concrete has hardened and marked out, pits are prepared for intermediate racks.
- Pull the thread along the top of the already installed racks (height control), the upper and lower parts of the racks (control of being on the same line).
Similarly to the corner ones, intermediate racks are installed, while alignment in the same plane and height is required, respectively, to the stretched threads. The height of the supports is regulated by adding or removing the gravel (sand) cushion.

To prevent moisture from getting inside, the top of the racks must be welded with metal plugs (it is easier to do this before installation), or use special plastic ones.
As a budget option, you can use the same parts of plastic bottles with bottoms. After putting on the rack, the bottle is evenly heated with a building hair dryer, decreasing in size and fitting the pipe very tightly. It looks interesting and stylish, it is almost impossible to recognize the original object in such plugs!

Technique for attaching the log to the supports
After the concrete has hardened, logs are attached to the supports using electric welding. For a fence 2 m high, the upper log should be placed at a height of 0.3 m from the top of the racks, the lower one - 1.7 m. It is obligatory to control the installation horizontally using a level.
After fixing the log in the places of welding, remove the slag, if necessary, clean the surfaces with a grinder. Treat the entire frame with primer and then paint, since after installing the profiled sheet it will be much more difficult to do this.
With a significant slope of the surface of the land, the racks and logs are placed with an offset in height. You can shift each span or through several sections, but always by the same amount and the same number of spans!

Installation and fastening of the profiled sheet
Directly fastening the sheet to the frame is the final operation in the construction of a fence from corrugated board with your own hands. Given that the lags are located strictly in level and at the same distance from each other, even before installation, it is necessary to calculate and mark on the profiled sheet the places for fasteners with a marker or soft pencil.
The first sheet is aligned strictly according to the level and attached to the logs. Subsequent sheets are superimposed and fastened with interception in one wave. Periodically, it is necessary to control the verticality of the material to be fixed (the height is set by the first sheet).

Scheme of mounting a fence from a profiled sheet with posts
If there is a clear shift in level, you can correct the situation a little on the next 2-3 sheets by fixing one side of the corrugated board and slightly stretching the desired loose corner. You can pull the sheet only a few millimeters, but often this is enough not to dismantle the fence and start the operation again.
If it is necessary to trim the corrugated board, it is better to use metal scissors. Use the "grinder" only as a last resort, since there is a high risk of damage to the material, burrs form, and the cut edge quickly rusts.
It is not necessary to put the sheet directly on the foundation (if any) during installation! It is better to leave a gap within 10 mm to prevent wetting and corrosion of the profiled sheet.

It is important to tighten the screw correctly
Do not tighten the screws too much to avoid deformation of the rubber layer of the washer, it is better to use a screwdriver with a selected tightening torque. After installation, be sure to remove the protective film (if any), because after a few months it will partially stick to the surface, and in some places it will crumble, giving the fence an untidy spotted look. The final stage is the installation of a decorative strip.

"Underside" of the fence
How to build a strip foundation fence

Installation of a fence with a foundation
To prevent damage to the bottom of the profiled sheet, the formation of rust in contact with the ground and to give the fence an aesthetic appearance, a foundation is used. Making a fence from corrugated board with a foundation with your own hands is more difficult, but also quite feasible. In fact, this is an ordinary shallow strip foundation with an optimal depth of 300-400 mm and a plinth from 100 mm high. The width of the foundation is not regulated, 200 mm will be enough

To make the foundation between the installed racks, you need to dig a foundation pit of the required depth, then make and install the formwork. Since the plinth will be visible, it is better not to save on formwork material. OBS-board is well suited for these purposes, even better - laminated plywood, and these materials can be used repeatedly by pouring the formwork in parts.
The technology itself is no different from pouring a strip foundation for a gazebo or other structure. Easier and faster work will advance with the use of a concrete mixer. To give the foundation strength, it is desirable to use reinforcement, at least a few threads welded to the racks.

Foundation formwork
Installation of a sectional fence with columns
The most beautiful, but also the most expensive sectional type fence design, where the sections are separated by columns (columns). To build a fence from corrugated board with posts with your own hands, you should first decide on the design and select the necessary material. It can be facing brick, natural stone, special decorative blocks. There are many options for decorating columns and foundations, all you need is a reasonable imagination and some bricklayer skills.

Fence scheme with columns
Pillars can be laid out as independent units or overlaid with installed metal racks, thus modernizing the option of a fence with a foundation. But, in any case, the foundation for the columns should be much more powerful and massive, since the columns themselves have an impressive weight. Be sure to reinforce the foundation, preferably in two rows. When laying the support, it is necessary to fill the voids between the support and the brick with concrete.

Fencing scheme with columns and foundation
If the posts are built without a finished fence frame, it is imperative to provide embedded metal parts for the subsequent fastening of the log, while strictly maintaining the horizontal level (both the posts themselves and the embedded parts).
Columns should be placed only after the foundation has dried, it is recommended to lay out no more than 500 mm of the column in height per day. Every third row of bricks is reinforced with a metal mesh for strength, the seams must be even and of the same size.

To reduce material consumption and facilitate installation, it is recommended to accurately calculate the distance between the posts so that a certain number of profiled sheets (usually 2 or 3) fit into it without trimming. The top of the column must be covered with a finished decorative cap or made conical to drain water.
As you can see, the task of how to build a fence from a profiled sheet with your own hands is not too difficult. This can be done by any person who has the skills to work with metal and concrete. Of course, you can always invite a specialist, but a job perfectly done on your own will delight you for many years to come!
Video: corrugated fence