Frame technology is a long-lasting trend in Europe and America. The costs of preparing buildings are minimal. This is much more profitable than buying an apartment in the city. Frame technology is adapted to climate change, which means it is optimally suited for the changeable Russian climate. you can build during the winter frost season and within a few months you will have a building fully equipped for living.
The key advantage of frames is proper weight distribution. Regardless of the number of rooms, the weight load on the supports is distributed harmoniously. That is why there is no need to build a massive foundation, spend money on purchasing reinforced concrete blocks and renting special equipment for digging a pit. Even an ordinary embankment, which consists of sand, crushed stone and cement, can fix and hold reinforcement and metal supports.
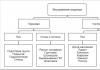
What designs of houses without a foundation exist?
You can get information about what types of frame houses there are, projects, photos and prices of these sites on the website of professional construction organizations. A competent company offers both a set of ready-made templates and layouts, and also works on individual orders. This is important when a building is being erected in a limited area, where it is necessary to fit a large number of rooms, but at the same time, correctly fit the structure into the composition of the garden plot.
A cottage without a foundation is much easier to modernize. We are talking about extensions in the form of verandas and gazebos. Thanks to this, you can continue the embankment or build a regular platform, which will not put an additional load on the foundation supports. This helps to create unusual solutions and implement bold architectural ideas.
When creating projects for houses without a foundation, special attention is paid to the engineering system. In such a situation, water and sewer lines are either taken outside or isolated directly under the house. This prevents serious repair costs in the event of a break or deformation of sewer pipes, which also speaks in favor of building frame houses without a foundation.
Time passes, and it turns out that the private house no longer satisfies the owners with its size and amenities. A decision is made to expand its area with an extension. We’ll tell you in this article how to do this efficiently and without extra costs.
Save money without harming quality – requirements for premises and materials
Poorly thought out design of an extension will eventually force something to be altered or completed, or added to the country house. In order to avoid getting into such a situation, we think through all the nuances, weigh the advantages and disadvantages of our idea. We start with choosing a location and size.
Each type of additional room has its own specific characteristics in connection with its use, requirements for insulation, waterproofing, and others. If a decision is made to build an additional living room in a country house, then this is tantamount to building a small house. It is necessary to reliably insulate and prevent the appearance of dampness. If you plan to stay in cold weather, you need to think about heating.
Another common type of extension is kitchens and bathrooms. The requirements for them are practically the same. First of all, we think about utilities and install them even before construction begins. It is much more convenient to lay sewer and water pipes before pouring the foundation than to dig underneath it later. The waterproofing of the floor covering requires increased attention. We are thinking about insulation, but if the kitchen is planned for summer, then you can save on this.
The house is being expanded by adding a veranda. The structure is light, serves for summer recreation, protects the entrance from wind, snow and rain. It is carried out in many variants: from the simplest in the form of a boardwalk, low walls with a roof on pillars, to complex with walls, doors, windows. No insulation is required, otherwise it will no longer be a veranda, but waterproofing the foundation is necessary.
The extension to the house must be in harmony with the main structure. If the house has external decoration, then it will not be difficult to repeat it in the attached room. All materials go well with wood, which looks great even without additional finishing. The best option would be a frame structure:
- it is built quickly, literally in a few months;
- does not require a capital foundation because it is lightweight;
- without special knowledge and skills, it can be built with your own hands;
- will cost less.
The foundation for the extension is made on the same level as the foundation of the house. When attaching a structure to a house, we do not do it tightly - over time it will shrink - but leave an expansion joint. In this regard, frame structures that do not shrink vertically compare favorably.
If the structure is attached to the front wall, the roof continues the main roof and is pitched. We choose the slope in such a way that the snow does not linger and the rain flows off. If this is an extension to a side wall, then the roof follows the configuration of the main one. The roofing material is the same as on the roof of the house, if different, it is important that they are combined.
Columnar base - fast, cheap, reliable
For the columnar foundation of the extension to the house, concrete, brick or a combination of both is used. It is made mainly for a living room or veranda. If used for a kitchen or bathroom, thermal insulation of the utility lines entering the house will be required. Since the protection concerns an average of half a meter of pipes, such expenses can be incurred, and it will still be cheaper than a strip foundation. The floor is made of boards; for concrete, you will need a lot of backfill material and a fence around the perimeter.
We start by marking the area, the installation locations of the pillars are one and a half meters from each other. A separate hole of 50x50 cm is dug under each pillar, with a depth greater than freezing of the soil. At the top we expand the pits a little: about 10 cm on each side. We fill the bottom with a 10 cm layer of sand, carefully compact it, then crushed stone or broken brick, which is also compacted.
We lay out the film for waterproofing and bring the ends to the surface. If we plan to build brick pillars, pour a little concrete mortar into each hole for the base and wait for it to set. When planning concrete pillars, we tie reinforcement at the top along the entire height and lower them into the pits. We ensure equal distance between the walls. We place pieces of brick under the bottom to raise the reinforcement by about 4 cm.
We make formwork for the base, inside which we run the film. We pour the concrete in layers, pierce each layer several times with a rod to release air bubbles. It is important not to rush, it is better to wait until it sets, then continue pouring. We carefully level the top of the column and wait about two weeks until the concrete hardens. All this time, water heavily and cover with burlap or film.
When the foundation reaches the required strength, the formwork is removed. We heat up the bitumen mastic, apply it to the pillars and immediately glue pieces of roofing felt for waterproofing. There is space left between the pillars, which it is advisable to fill in to insulate the floor. We use ordinary soil mixed with crushed stone or pieces of brick. Fill in layers of 10 cm and tamp. The technology for constructing a strip foundation is practically no different, but unlike a columnar foundation, it is solid.
Getting started - bottom frame and extension floor
So, we settled on the frame option as the fastest and cheapest. In order for wood to serve for a long time, you need to adhere to two rules: make reliable waterproofing and carry out antiseptic treatment. Of course, the wood must be well dried. For waterproofing, the most reliable means is bitumen mastic. It is possible to use several layers of roofing material, but it is short-lived.
Then we make the bottom trim. Usually 150x150 mm timber is used, but it is possible to use 150x50 mm boards. We lay them horizontally along the entire perimeter, aligned with the outer edges of the foundation. We do not connect the boards of the first row to each other. We lay the second row on top, overlapping the joints in the first.
In the boards laid in this way on the foundation, we make through holes for the studs and connect them. If it is strip, we drill and connect it on the ground, and then lay it down. To get the effect of a single beam, we knock it down with nails in a checkerboard pattern every 20 cm. The result is a binding of the required thickness, which also has additional advantages:
- costs much less than beams;
- It’s very easy to connect them together, but with bars it’s more difficult.

We attach the bottom frame to the beds from the same 150x50 mm boards, installed on top of the edge along the outer edge. We fasten them together and with the beds with 90 mm nails. Next we install logs made of similar material installed on the edge. The distance between them is 60–80 cm, but it all depends on the size of the frame extension: the longer the logs, the narrower we install them. They are attached to the trim board with nails, 2 on each side.
Now let's start insulating the floor. The cheapest, although not very environmentally friendly option, is tile polystyrene foam with a density of at least 15 kg/m3. Its advantage is that it is the only insulation material that is not afraid of moisture. We nail 50x50 mm bars to the lower edges of the logs, which will hold the polystyrene foam. A thickness of 15 cm is required: we use sheets of 10 and 5 cm. We lay them so that the seams of the bottom and top rows overlap.

The base is ready. We lay the subfloor on top. To prevent it from warping over time, we lay it alternating the direction of the annual rings. We look at the cut: we place one board with an arc up, the other - down. We make the finishing floor from plywood, the joints are staggered. A rough base is not necessary if there are edged tongue-and-groove boards with a thickness of 30 mm or more or 15 mm plywood. We lay it directly along the joists.
Wall installation - two assembly technologies
There are two technologies for assembling frame buildings. The first is called frame-panel, when the entire assembly is carried out on the ground, then the finished structures are installed in place and fastened together. Sometimes the frame is immediately sheathed, which makes it even stronger. Another method involves gradual installation on site. Which one is more convenient - everyone decides for himself. A shield assembled on the ground cannot be lifted alone; assistants will be needed.
We begin the construction of the frame with the corner posts. For them and intermediate posts we use timber 150×150 mm or even 100×100 mm. The distance between the racks is determined by the width of the insulation, which we find out in advance. We position the pillars so that the gap between them is 3 cm narrower than the width of the insulation. This way we will save on waste-free use of material and improve the quality of insulation without leaving gaps.

Fastening can be done simply and reliably using metal corners installed on both sides of the racks and secured with stainless steel screws. Before finally fixing the stand, we carefully check its verticality, this is especially important for the corners. One incorrectly aligned beam will cause the entire extension to bend.
Temporary bevels, which are installed from the inside and serve until the outer skin is attached, help maintain the correct shape of the frame. If the sheathing is made of a rigid and durable material such as plywood, OSB, GVK, it is capable of independently strengthening the base, which will stand securely after removing the temporary slopes. When soft material is planned for the cladding: siding, lining, then permanent braces cannot be avoided. It is better to install them two at the bottom and at the top of each rack.

At the places where windows and doors are installed, we attach crossbars. We make double racks next to them: they experience increased loads and must be stronger. The final fastening of the frame is carried out by installing the upper trim. In order not to invent anything, it can be similar to the bottom one: a bed made of two boards fastened together and the actual harness made of the same boards installed on the edge. To it, in the same way as the floor joists were attached, we nail the floor beams from 150x50 boards on the edge.
We constantly check the geometry of the entire structure, as well as the correct installation of the racks and crossbars: the racks are strictly vertical, the crossbars are horizontal.
Shed roof - design and technology
The roof of a house with an extension consists of two parts, which should be harmoniously combined into one. If the extension is built on the side, the roof will be a continuation of the main one; all that remains is to repeat its design in order to lengthen it. When an attached building is located along its length, its roof is made of a pitched roof. The slope is ensured by the difference in height of the front and rear pillars. The height of the rear ones should ensure that the roof of the extension goes under the main canopy.
The roof is supported by rafters, which we lay on beams. They are made from thick boards, to ensure fixation, we make special grooves. We cut them out on the ground according to a template so that they are all the same. Then after installation in place there will be no need to align horizontally. We treat the grooves with mastic, install them and fasten them to the walls with brackets and metal corners on studs. If the length exceeds 4 m, we install additional vertical supports.

We lay the sheathing on top of the rafters. Depending on the roofing material, we make it continuous or in increments of 0.3–0.6 m. The need for continuous wooden flooring arises when using soft material; we make sparse material for all other types of roofing. We make fastening depending on the type of roof. We fasten corrugated sheets and metal tiles with special self-tapping screws having sealing washers, and ondulin with nails with a wide head. We provide wave overlap. Don't forget about the final design: wind strips not only protect the roof, but also give it a finished look.
Insulation is a mandatory operation for an extension
Mineral wool and polystyrene foam are mainly used to insulate buildings. Mineral wool resists fire and has low thermal conductivity. They are light in weight and have a consumer-friendly release form: rolls, mats. Another popular insulation material is polystyrene foam. Its advantages: it is inexpensive, not afraid of fungus, moisture, rotting. But there are two big drawbacks: rodents love it, and in case of fire it emits toxic gases.

We carry out insulation from the inside in the following sequence:
- 1. We install the waterproofing, having previously cut strips of the required sizes. We fasten with staples using a construction stapler, so as to ensure overlap. We sheathe the frame completely, driving in staples every 10 cm.
- 2. Place insulation between the studs. We ensure a tight fit to the wooden structures, close the seams between the individual elements of the insulating material, overlapping the next layer.
- 3. We attach the vapor barrier, even if we use polystyrene foam. The fact is that it is necessary to protect not only the insulation, but also the wood. We perform fastening in the same way as waterproofing.
- 4. We cover the walls from the inside. We use plasterboard over a perfectly flat frame or OSB if there are any unevenness. It is tougher and smoothes out imperfections.
All that remains is the interior and exterior decoration, which leaves room for the owner’s imagination. A frame extension is built quickly, cheaply, lasts for decades, and can be built with virtually no outside help.
Over time, some private buildings require expansion for various reasons. For example, an increase in the number of people sitting, installing a sewer system into the house, or the need to close the front door from direct exposure to cold. Therefore, there is a need for an additional room, expanding the kitchen, creating a room for a bathroom, or simply building a veranda.
A do-it-yourself extension to a house can be made of wood, brick, or a combination that includes several building materials.
Premises requirements
To avoid having to make additional changes to the attached room, it is better to immediately think through all the nuances of the extension, since each of them requires a special approach.
Additional room
If you need to add another living room to the house, you will have to try, since this work is almost equivalent to building a small house. The floors, walls and ceiling of the building must be well insulated, otherwise the heating installed in it will not be effective - this is one of the main conditions for a living space. The second important condition for normal living is the absence of dampness in the room, which means reliable waterproofing is needed.
Kitchen or bathroom
When constructing these premises, before installing the foundation, utilities are brought to the construction site - in particular, sewer pipes. You may have to install the water supply separately.
In addition, it is also worth paying attention to the insulation of all elements of the structure, and think about reliable waterproofing of the floor.
Veranda
A veranda is a lightweight structure that mainly serves to protect the main entrance to the house from wind and rain or is used for summer recreation. It may be closed, have a door and one or more windows, and May be and completely open, that is, it consists of a flooring, low walls and a roof raised on pillars.
This structure does not require special insulation, but it will still be necessary to waterproof the foundation.
Construction of the foundation for the extension
The foundation for the extension can be strip, made of brick or stone blocks, or columnar. Each of them has its own advantages and disadvantages. To settle on one of them, you need to find out how each structure works and choose the one that is more suitable for a particular extension.
Information about building the foundation
Strip foundation
So, the strip foundation is arranged in the following sequence:
- First you need to mark and trace the place where the extension will be installed. This is done using a rope, which is stretched on the ground and secured with pegs.

- Next, following the markings, a trench is dug to the same depth as the foundation of the entire house. Before pouring concrete, it would be a good idea to secure the reinforcement that connects the foundations of the main building and the extension.
- The width of the trench should be 100-150 mm greater than the planned wall thickness.
- After the trench has been dug, further preparation begins. First, the bottom is filled with a sand cushion 100-120 mm thick. It must be compacted thoroughly.
- The next layer is filled with crushed stone or broken brick, which is also compacted with a hand tamper.
- Next, waterproofing is placed in the trench along the entire perimeter, which should extend to the ground surface by 40-50 cm, since it should cover not only the inside of the foundation, but also the formwork for its above-ground part.
- A welded reinforcement structure is installed on the waterproofing film, which should follow the shape of the foundation, and over its entire height.
- Then the reinforcement is poured with a rough concrete solution of cement and gravel to ⅓ of the height of the trench, and after this layer hardens, the next one is poured to one-half of the remaining height.
 Installation of formwork for strip foundations
 - After pouring this layer, you can start installing wooden formwork to form the above-ground part of the foundation - the plinth. The waterproofing film is left inside the formwork, spread along its walls and secured on top of them so that it does not slide into the concrete.
- Concrete is poured into the prepared formwork to the top. Then the solution is pierced in several places with a shovel so that there are no air cavities left inside it. You can lightly tap the formwork - such vibration will help the concrete to compact as much as possible.

- Having completed pouring the foundation, the concrete is leveled to the required level and left to dry, sprinkled with water daily to strengthen it.
- After the concrete has completely hardened, the formwork is removed and the foundation is waterproofed from the outside.
- Before starting the construction of walls, it is recommended to additionally cover the foundation with waterproofing compounds or roll materials. For this process, liquid rubber, tar, bitumen mastic and roofing felt are used.

- The space inside the strip foundation can also be equipped in different ways - with a concrete screed or a flooring of floor beams and joists with a wooden floor installed on them.
Video - construction of an extension to a house on a strip foundation
Columnar foundation
In addition to a strip foundation, a columnar foundation can be constructed, which is built from brick or concrete, or a combination of these materials. This option is mainly used for the construction of verandas or additional living rooms, since communications associated with water supply or drainage in an uninsulated or even open underground will require additional thermal insulation.

A columnar foundation is most often installed if it is planned to install a boardwalk.
The work is carried out in several stages:
- The first step is marking the area chosen for the extension. The pillars should be one and a half meters apart from each other.

- Excavations are dug for each pillar separately. Their depth should be 500-600 mm, with a square side of 500 × 500 mm. Towards the top, the pits should widen slightly - about 100 mm on each side.
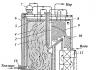
 Foundation pillar installation diagram
 - Next, the bottom is strengthened in the same way as when installing a strip foundation, using sand and crushed stone, and waterproofing is laid.
- If the support pillars will be built from brick, it is recommended to lay a layer of coarse cement mortar on the bottom. Only after waiting for it to harden do they make brickwork.
- If the pillars are concrete, a reinforcement structure and formwork are installed at the bottom of the pits to the height of the future pillar. The waterproofing film is placed inside the formwork and secured on top of it;
- Concrete is poured into the formwork in layers. Each layer must set well before the next one is poured;
- The top of the column is well leveled and sprinkled with water daily until it hardens completely;
- After the pillars are ready, the formwork is removed from them and they waterproofed roofing material, which is glued onto heated bitumen mastic.
- The gap remaining between the soil and the pillars is backfilled, compacting every 100-150 mm of backfilled soil mixed with crushed stone.
- Several layers of roofing material are laid on each of the pillars - it is necessary for waterproofing the wooden blocks that will be laid on top of the pillars.
Installation of the base floor of the extension
If a strip foundation is chosen, both wooden and concrete floors can be installed on it. A columnar foundation without lintels requires the installation of a wooden floor.
Concrete floor
To make a reliable and warm floor screed inside a strip foundation, you need do work step by step, adhering to a certain technology.
- To begin with, excess soil is selected from inside the finished strip foundation. It is first loosened and then removed to a depth of approximately 250-350 mm.
- A ten-centimeter sand cushion is poured and compacted onto the bottom of the resulting pit. Crushed stone can be laid on top of it, but to insulate the screed, instead of crushed stone, expanded clay is used, poured in a layer of 15-20 cm.

- Expanded clay is leveled, and a reinforcing grid is laid on it. After its installation, a system of beacons is installed on top at the selected horizontal level. Some rooms, for example, a bathroom or an open terrace, may require a certain slope of the surface to allow water that falls on the floor to flow smoothly to the drainage system.
- Next, cement mortar is laid out on the prepared surface and leveled using the rule. After a day, it can be covered with plastic film - then the concrete will mature more evenly, which will give it additional strength.
When the walls of the extension are erected, any decorative covering or wooden floor can be laid on the resulting concrete base.
Floor on wooden beams
- Floor beams are wooden blocks of fairly large thickness, about 150 × 100 mm in cross section. You cannot skimp on them, since the overall strength of the floor will depend on their reliability.

- The beams are laid on pillars or strip foundations, on top of a fabricated roofing felt substrate, and can be secured to the concrete in a variety of ways - using through fasteners, angles and other metal fixtures. The beams at the intersection points are also fastened together using strong corners.

- They will hold securely, since the wooden flooring of the “black” and “white” floors also serves as a kind of binding fastener.
Video: construction of a frame extension with a wooden floor
Construction of extension walls
Brick or frame walls can be built on a finished strip foundation, while a columnar foundation is mainly used for frame buildings. If you plan to make brickwork on the pillars, then you will have to make additional concrete lintels between the pillars.
Frame walls
- The frame for future walls is erected from timber and secured to the previously installed crown beams. The beams can be attached to the beams separately, but sometimes it is much more convenient to assemble the wall elements in a horizontal position, on a flat area, and then install them in a vertical position already assembled.

- To connect the frame to the wall of the house, a perfectly accurate vertical marking is made on it, along which a separate block or assembled frame element will be fixed.

- For reliability, all bars are connected to each other with metal corners.

- Having installed the entire frame of the extension, it is better to immediately sheathe it with boards or plywood (OSB) from the outside. Sheathing will immediately make the structure more rigid.

- The upper horizontal beam running along the house is attached to the main wall using reliable metal corners or anchors.
- The walls are insulated after the roof is installed.
Video: another example of constructing a light extension to a house
Brick walls

- Before you start building brick walls, you need to carefully check the horizontalness of the foundation surface and, if necessary, level it to perfection. If the base is uneven, the masonry may crack due to deformation during shrinkage.
- It should be noted that brick extensions are best done to a brick house. To connect the extension to the main wall, during the construction of the walls, holes are drilled in it to two-thirds of the depth, every two or three rows of masonry. Reinforcement is embedded in them, which should protrude from the wall by about half a meter. It should be in the seams of the future masonry. To ensure that the seams in these rows are not excessively wide, the reinforcement must be chosen not too thick, or you will have to make a recess in the bricks of the row on which the reinforcement will be laid.
- If a brick extension is installed against a wooden wall, then a hole is drilled through it, into which reinforcement with a transverse stopper is installed from inside the house, which will hold it in the wall. The reinforcement is also installed as the wall is erected, every two or three rows.

- Before starting masonry, a string is stretched along the future wall, along which it will be easy to control the horizontality of the rows, and the verticality is constantly verified using a plumb line.
- The thickness of the walls will depend on what function the extension will perform. If this is a living room, then the masonry should be at least one or two bricks. If the room will serve as a veranda or utility room, then half a brick will be sufficient.
- Having built brick walls, they are connected along the entire top with a concrete belt. Formwork is made for it, a reinforcement structure is laid in it and poured with concrete mortar. After the solution has completely hardened, the formwork is removed from the belt, and you can begin installing the ceiling.
It should be noted that building brick walls is not as easy as it seems, therefore, if you have no experience in this work, it is better to entrust this process to a qualified mason or choose a different type of wall.
Extension ceiling and roofing
After the walls are erected, it is necessary to make a ceiling. For it you will need beams - beams, which are installed on the upper part of the walls, at a distance of 60-70 cm from each other, and secured with special corners.
If the beams are laid on a brick building, they can be embedded in a concrete belt, having first wrapped the edge of each of them with roofing material.

The next step is to line the beams with boards or thick plywood, on which insulation will be laid on top, between the beams.
The roof of the extension can have different designs, but generally the lean-to option is chosen, which is worth considering.

- This structure consists of rafters on which the roof is laid. This type of roof is quite simple to install; the main thing is to choose the correct slope angle. It must be no less than 25 — 30 degrees - this is necessary so that precipitation in winter does not linger on the surface, otherwise it can simply damage it.
- Having determined the slope angle, a mark is made on the wall or façade of the roof in the form of a horizontal, even line along which the block supporting the rafters in the upper part will be attached. The lower support for them will be the previously laid floor beams or the edge of the wall. The rafters should extend beyond the boundaries of the constructed walls by 250 — 300 mm, in order to protect the walls as much as possible from rainwater.
- The rafters are also secured using metal corners.
- It will be more difficult to resolve the issue of roof slope if the extension is installed on the side on which the slope of the main building of the house is located, since there will simply be nothing to secure the transverse beam there. Therefore, it may be necessary to remove several lower rows (sheets) of roofing material from the roof of the house in order to use its beams to secure the rafter system and combine the overall covering.
- You need to decide in advance what kind of roofing will be laid on top of the rafter system. If it is a soft roof or flexible tiles, then a solid material is laid on top of the rafters and secured, for example, plywood or frequent transverse lathing.
- If large sheets will be fixed (roofing iron, metal tiles, slate, etc.), then they can be overlapped with directly installed rafters.
- When the system under the covering material is ready, it is recommended to lay waterproofing on it. In the first case, plywood is covered with it, in the second, it is fixed to the rafters.
- The roofing material is laid on top of the waterproofing material, starting from the bottom of the rafter system and rising to the top. If it is necessary to combine the roof, then when joining, the top row of the extension roof is slipped under the last row of the roof slope of the main building.
- If the roof adjoins the upper part of the roof to a wall or the front part of the roof, then the joint between them must be waterproofed.
- When the roof over the erected extension is ready, you can begin to insulate the walls and floor.
Prices for metal tiles
Metal tiles
Insulating the extension from the inside
If the room is residential, then reliable thermal insulation is indispensable. If the ceiling is already sheathed and insulated, then you can proceed to insulating the floor.
Floor insulation on beams
If floor beams were installed on a columnar foundation for the floor, then the work proceeds as follows:
- Transverse logs made of smaller bars are attached to the floor beams.
- It is recommended to install a subfloor on the joists; in this case, it is better to lay the boards for it as a continuous flooring, otherwise the heat will be blown out of the house.

- Next, the entire rough coating is coated with a fairly thick clay solution, and after drying, a vapor barrier film is laid on it.
- Mineral wool is placed tightly between the joists and expanded clay or slag is poured.

- On top, the insulation is again covered with a vapor barrier, and a wooden floor made of boards or plywood is laid on it.
- A decorative coating can be immediately laid on the plywood, or an infrared film floor can be installed underneath it.
Concrete floor
A concrete floor can be insulated as follows:
- Mineral wool laid between joists fixed to a concrete base and then covered with boards or plywood.
- One of the “warm floor” systems (electric or water), which fits into the final leveling screed;
- Infrared film laid on a thin thermo-reflective substrate, and covered with a decorative coating;
- Dry screed and gypsum fiber slabs.
When the floors are insulated, you can move on to thermal insulation of the walls.
Frame walls
- For internal wall insulation, mineral wool produced in mats is used. They are conveniently laid between the frame bars. This work is simple and can be done fairly quickly.
- When the walls are covered with insulation, it is covered with a vapor barrier film, securing it to the bars with staples.
- Then the wall can be covered with natural wooden paneling, OSB boards or plywood, plasterboard or gypsum fiber board - there are a lot of options, there is plenty to choose from.

Expanded polystyrene can also be used as wall insulation, but its environmental and performance qualities are much worse than those of high-quality mineral wool.
Brick walls
Brick walls are usually finished on the inside with plaster or plasterboard, and insulation is carried out on the outside, but it is also done differently.
Insulation, if space allows, can be carried out in the same way as in a frame building, by securing bars to the walls and laying mineral wool between them, and then covering the structure with plasterboard slabs. Wallpaper or any other decorative material can be glued to this coating.
To do everything right, you need to study in detail each stage of the construction of the extension and adhere to the developed technologies. If you don’t have confidence in your capabilities, or you feel a clear lack of skills and experience in construction, it is better to entrust this rather complex work to qualified craftsmen.
Time passes, and it turns out that the private house no longer satisfies the owners with its size and amenities. A decision is made to expand its area with an extension. We’ll tell you in this article how to do this efficiently and without extra costs.
1 Save money without harming quality – requirements for premises and materials
Poorly thought out design of an extension will eventually force something to be altered or completed, or added to the country house. In order to avoid getting into such a situation, we think through all the nuances, weigh the advantages and disadvantages of our idea. We start with choosing a location and size.
Each type of additional room has its own specific characteristics in connection with its use, requirements for insulation, waterproofing, and others. If a decision is made to build an additional living room in a country house, then this is tantamount to building a small house. It is necessary to reliably insulate and prevent the appearance of dampness. If you plan to stay in cold weather, you need to think about heating.
Another common type of extension is kitchens and bathrooms. The requirements for them are practically the same. First of all, we think about utilities and install them even before construction begins. It is much more convenient to lay sewer and water pipes before pouring the foundation than to dig underneath it later. The waterproofing of the floor covering requires increased attention. We are thinking about insulation, but if the kitchen is planned for summer, then you can save on this.
The house is being expanded by adding a veranda. The structure is light, serves for summer recreation, protects the entrance from wind, snow and rain. It is carried out in many variants: from the simplest in the form of a boardwalk, low walls with a roof on pillars, to complex with walls, doors, windows. No insulation is required, otherwise it will no longer be a veranda, but waterproofing the foundation is necessary.
The extension to the house must be in harmony with the main structure. If the house has external decoration, then it will not be difficult to repeat it in the attached room. All materials go well with wood, which looks great even without additional finishing. The best option would be a frame structure:
- it is built quickly, literally in a few months;
- does not require a capital foundation because it is lightweight;
- without special knowledge and skills, it can be built with your own hands;
- will cost less.
The foundation for the extension is made on the same level as the foundation of the house. When attaching a structure to a house, we do not do it tightly - over time it will shrink - but leave an expansion joint. In this regard, frame structures that do not shrink vertically compare favorably.
If the structure is attached to the front wall, the roof continues the main roof and is pitched. We choose the slope in such a way that the snow does not linger and the rain flows off. If this is an extension to a side wall, then the roof follows the configuration of the main one. The roofing material is the same as on the roof of the house, if different, it is important that they are combined.
2 Columnar base - fast, cheap, reliable
For the columnar foundation of the extension to the house, concrete, brick or a combination of both is used. It is made mainly for a living room or veranda. If used for a kitchen or bathroom, thermal insulation of the utility lines entering the house will be required. Since the protection concerns an average of half a meter of pipes, such expenses can be incurred, and it will still be cheaper than a strip foundation. The floor is made of boards; for concrete, you will need a lot of backfill material and a fence around the perimeter.
We start by marking the area, the installation locations of the pillars are one and a half meters from each other. A separate hole of 50x50 cm is dug under each pillar, with a depth greater than freezing of the soil. At the top we expand the pits a little: about 10 cm on each side. We fill the bottom with a 10 cm layer of sand, carefully compact it, then crushed stone or broken brick, which is also compacted.
We lay out the film for waterproofing and bring the ends to the surface. If we plan to build brick pillars, pour a little concrete mortar into each hole for the base and wait for it to set. When planning concrete pillars, we tie reinforcement at the top along the entire height and lower them into the pits. We ensure equal distance between the walls. We place pieces of brick under the bottom to raise the reinforcement by about 4 cm.
We make formwork for the base, inside which we run the film. We pour the concrete in layers, pierce each layer several times with a rod to release air bubbles. It is important not to rush, it is better to wait until it sets, then continue pouring. We carefully level the top of the column and wait about two weeks until the concrete hardens. All this time, water heavily and cover with burlap or film.
When the foundation reaches the required strength, the formwork is removed. We heat up the bitumen mastic, apply it to the pillars and immediately glue pieces of roofing felt for waterproofing. There is space left between the pillars, which it is advisable to fill in to insulate the floor. We use ordinary soil mixed with crushed stone or pieces of brick. Fill in layers of 10 cm and tamp. The technology for constructing a strip foundation is practically no different, but unlike a columnar foundation, it is solid.
3 Getting started - bottom frame and floor of the extension
So, we settled on the frame option as the fastest and cheapest. In order for wood to serve for a long time, you need to adhere to two rules: make reliable waterproofing and carry out antiseptic treatment. Of course, the wood must be well dried. For waterproofing, the most reliable means is bitumen mastic. It is possible to use several layers of roofing material, but it is short-lived.
Then we make the bottom trim. Usually 150x150 mm timber is used, but it is possible to use 150x50 mm boards. We lay them horizontally along the entire perimeter, aligned with the outer edges of the foundation. We do not connect the boards of the first row to each other. We lay the second row on top, overlapping the joints in the first.
In the boards laid in this way on the foundation, we make through holes for the studs and connect them. If it is strip, we drill and connect it on the ground, and then lay it down. To get the effect of a single beam, we knock down nails in a checkerboard pattern every 20 cm. The result is a strapping of the required thickness, which also has additional advantages:
- costs much less than beams;
- It’s very easy to connect them together, but with bars it’s more difficult.
We attach the bottom frame to the beds from the same 150x50 mm boards, installed on top of the edge along the outer edge. We fasten them together and with the beds with 90 mm nails. Next we install logs made of similar material installed on the edge. The distance between them is 60–80 cm, but it all depends on the size of the frame extension: the longer the logs, the narrower we install them. They are attached to the trim board with nails, 2 on each side.
Now let's start insulating the floor. The cheapest, although not very environmentally friendly option, is tile polystyrene foam with a density of at least 15 kg/m3. Its advantage is that it is the only insulation material that is not afraid of moisture. We nail 50x50 mm bars to the lower edges of the logs, which will hold the polystyrene foam. A thickness of 15 cm is required: we use sheets of 10 and 5 cm. We lay them so that the seams of the bottom and top rows overlap.

The base is ready. We lay the subfloor on top. To prevent it from warping over time, we lay it alternating the direction of the annual rings. We look at the cut: we place one board with an arc up, the other - down. We make the finishing floor from plywood, the joints are staggered. A rough base is not necessary if there are edged tongue-and-groove boards with a thickness of 30 mm or more or 15 mm plywood. We lay it directly along the joists.
4 Wall installation - two assembly technologies
There are two technologies for assembling frame buildings. The first is called frame-panel, when the entire assembly is carried out on the ground, then the finished structures are installed in place and fastened together. Sometimes the frame is immediately sheathed, which makes it even stronger. Another method involves gradual installation on site. Which one is more convenient - everyone decides for himself. A shield assembled on the ground cannot be lifted alone; assistants will be needed.
We begin the construction of the frame with the corner posts. For them and intermediate posts we use timber 150×150 mm or even 100×100 mm. The distance between the racks is determined by the width of the insulation, which we find out in advance. We position the pillars so that the gap between them is 3 cm narrower than the width of the insulation. This way we will save on waste-free use of material and improve the quality of insulation without leaving gaps.

Fastening can be done simply and reliably using metal corners installed on both sides of the racks and secured with stainless steel screws. Before finally fixing the stand, we carefully check its verticality, this is especially important for the corners. One incorrectly aligned beam will cause the entire extension to bend.
Temporary bevels, which are installed from the inside and serve until the outer skin is attached, help maintain the correct shape of the frame. If the sheathing is made of a rigid and durable material such as plywood, OSB, GVK, it is capable of independently strengthening the base, which will stand securely after removing the temporary slopes. When soft material is planned for the cladding: siding, lining, then permanent braces cannot be avoided. It is better to install them two at the bottom and at the top of each rack.

At the places where windows and doors are installed, we attach crossbars. We make double racks next to them: they experience increased loads and must be stronger. The final fastening of the frame is carried out by installing the upper trim. In order not to invent anything, it can be similar to the bottom one: a bed made of two boards fastened together and the actual harness made of the same boards installed on the edge. To it, in the same way as the floor joists were attached, we nail the floor beams from 150x50 boards on the edge.
We constantly check the geometry of the entire structure, as well as the correct installation of the racks and crossbars: the racks are strictly vertical, the crossbars are horizontal.
5 Shed roof - design and technology
The roof of a house with an extension consists of two parts, which should be harmoniously combined into one. If the extension is built on the side, the roof will be a continuation of the main one; all that remains is to repeat its design in order to lengthen it. When an attached building is located along its length, its roof is made of a pitched roof. The slope is ensured by the difference in height of the front and rear pillars. The height of the rear ones should ensure that the roof of the extension goes under the main canopy.
The roof is supported by rafters, which we lay on beams. They are made from thick boards, to ensure fixation, we make special grooves. We cut them out on the ground according to a template so that they are all the same. Then after installation in place there will be no need to align horizontally. We treat the grooves with mastic, install them and fasten them to the walls with brackets and metal corners on studs. If the length exceeds 4 m, we install additional vertical supports.

We lay the sheathing on top of the rafters. Depending on the roofing material, we make it continuous or in increments of 0.3–0.6 m. The need for continuous wooden flooring arises when using soft material; we make sparse material for all other types of roofing. We make fastening depending on the type of roof. We fasten corrugated sheets and metal tiles with special self-tapping screws having sealing washers, and ondulin with nails with a wide head. We provide wave overlap. Don't forget about the final design: wind strips not only protect the roof, but also give it a finished look.
6 Insulation is a mandatory operation for an extension
Mineral wool and polystyrene foam are mainly used to insulate buildings. Mineral wool resists fire and has low thermal conductivity. They are light in weight and have a consumer-friendly release form: rolls, mats. Another popular insulation material is polystyrene foam. Its advantages: it is inexpensive, not afraid of fungus, moisture, rotting. But there are two big drawbacks: rodents love it, and in case of fire it emits toxic gases.

We carry out insulation from the inside in the following sequence:
- 1. We install the waterproofing, having previously cut strips of the required sizes. We fasten with staples using a construction stapler, so as to ensure overlap. We sheathe the frame completely, driving in staples every 10 cm.
- 2. Place insulation between the studs. We ensure a tight fit to the wooden structures, close the seams between the individual elements of the insulating material, overlapping the next layer.
- 3. We attach the vapor barrier, even if we use polystyrene foam. The fact is that it is necessary to protect not only the insulation, but also the wood. We perform fastening in the same way as waterproofing.
- 4. We cover the walls from the inside. We use plasterboard over a perfectly flat frame or OSB if there are any unevenness. It is tougher and smoothes out imperfections.
All that remains is the interior and exterior decoration, which leaves room for the owner’s imagination. A frame extension is built quickly, cheaply, lasts for decades, and can be built with virtually no outside help.
Is it true that the foundation for an extension differs from the main one, what are its features? Many people are looking for the answer to this question, because when adding additional rooms to an existing house, you want these rooms to also have a reliable foundation. We have collected the most important tips and instructions in this article.
Wouldn't an extension be possible without a foundation?
Everyone knows what role the skeleton plays in the human body; similar functions are assigned to the foundation. In fact, this is the basis that is responsible for the reliability and durability of the building. Also, it is the foundation that ensures warmth and dryness in the room. If the base is of poor quality or does not suit specific conditions, then dampness will appear inside, the floors may become deformed and completely deteriorate. It also levels the ground level and prevents carcinogenic gas from entering the living room from the soil.

Extension base
The choice of foundation should be treated with particular care. After all, it is necessary that it can easily withstand loads and correspond to the type of soil. At the same time, there is no need to overdo it, for example, if you can pour a strip or columnar foundation, then there is no point in replacing these simpler options with a complex monolithic foundation. Firstly, it is too expensive and not worth the investment. Secondly, the first ones are much easier to perform and you can do them yourself even without outside help, but you won’t be able to lay a concrete slab on your own.
It is mainly built from stone or concrete, but there are also wooden structures. If the construction is lightweight, then you can give preference to a shallow foundation located above the freezing point. But most often its depth should be below this level. According to its purpose, it is divided into load-bearing and combined. The latter, in addition to standard load-bearing functions, must also provide seismic protection. There is also a special type, which includes “swinging” and “floating” foundations, their pressure corresponds to the pressure of the excavated soil.
Which types of base to choose from?
In this paragraph, we will consider what types the foundation for an extension is divided into. Tape can rightfully be called universal, because it is perfect for both heavy and lightweight structures. It is located only under external and external load-bearing walls. It is mainly poured from concrete; to make the structure more reliable, it should be reinforced with iron rods. If you are going to make this type of base with your own hands, then it is better to give preference to the prefabricated version. The disadvantages include high cost.

Universal strip foundation
But the columnar one, on the contrary, refers to budget options. But it is advisable to use it only if we are talking about lightweight structures, for example, you need to attach a frame extension to a wooden house. The supports are special pillars located at intervals of 1.5 to 3 meters. These pillars must be placed at the intersection of load-bearing walls. It is best to make such elements from brick or reinforced concrete, but larch beams can also be used. However, such supports are expensive, and wood is not durable.
If you are going to build a rather massive building, and weak soil predominates, then you should give preference to the pile type of foundation. This design consists of supports connected by means of a strapping beam.
How can two foundations be connected?
The foundation for the extension can be rigidly adjacent to the base of the housing, resulting in the formation of a single structure. This solution is relevant if the site has a weak or non-heaving type of soil. You should also give preference to this option when you are going to make an extension of several floors and want to connect it with the main housing through one roof.
If the base is a slab, then a monolithic foundation should also be poured for additional housing. In this case, it is necessary that its thickness is at least 400 mm or that the base of the residential building has protrusions. In this case, you can weld the slab reinforcement to the frame of the new foundation. In addition, if you wish, you can do everything yourself.
Monolithic foundation slab
The “tape-to-tape” connection assumes the presence of a sand cushion and reinforcement with a longitudinal slot. Metal rods are driven into specially prepared holes in the base of the house and form a frame for the new foundation. Next, the joint is made using a release about 40 cm long.
You can also build a separate foundation for an extension, which will be located in close proximity to the house. A sheet of roofing material should be placed between the two bases. This material acts as an excellent waterproofer; you can also place a layer of thermal insulation or get by with simple tow. In this case, it is very important that this layer allows the new base not to collect water during precipitation and not damage the foundation of the house. On the outside, special decorative overlays are fixed to the wall to cover the seam.
Laying the foundation - we do it according to science
Now let's move on to the practical part and look at how to make a foundation for an extension with your own hands. This detailed instruction will help you save on the services of a specialist, because it is designed for independent execution of construction work.
Building a foundation for an extension with your own hands
How to make a foundation for an extension to a house - step-by-step diagram
Step 1: Selecting a Base
The new foundation must fully correspond to the type of the previous foundation. In addition, the load and soil type are taken into account. For example, if we are talking about a massive extension to a brick house, then it is necessary to lay a strip or make a pile foundation. But if the additional room is adjacent to a wooden dwelling, then it is possible to get by with a cheaper columnar option.
Step 2: Calculations
Regardless of whether you choose a rigid connection type or a separate foundation, the depth and width, as well as the dimensions of the foundation pillars, if any, should be the same as those of the foundation of the house. Determining these parameters is quite simple. It is necessary to dig a hole next to the wall of the house and measure the dimensions of the base. If there should be no questions about how to measure the depth of the structure, then to measure the width, you should take a rod, bend one of its edges 90° and insert it in a horizontal position under the foundation. Then we turn the rod until its bent part rests on the reverse side. After this, you need to make a mark on the rod and pull it out. By measuring the distance from the hook to the mark, we know the width.
Step 3: Preparatory work
Before pouring the foundation for the extension, it is necessary to carry out preparatory work. If you decide to give preference to a rigid connection, then we dig a trench of the given dimensions and drill holes in the existing base. Moreover, their diameter must exceed the thickness of the reinforcement. Metal rods should also be prepared. It is necessary to make a longitudinal slot at their end and insert a special wedging insert into it.
Step 4: Frame Formation
We drive the reinforcement with wedges into the prepared holes. The number of rods is taken at the rate of 20 pieces per square. In this way, the frame of the future foundation is formed. To ensure a reliable connection of the following parts, it is necessary to leave the edges of the reinforcement about 300 mm long, which will subsequently need to be welded.
Step 5: Installation of formwork
Now you will need wide wooden boards. We form the formwork of the given dimensions. We securely fix its walls with supports, earth, cinder blocks, etc. You can cover the inside of the formwork with polyethylene. The latter is especially true if you are pouring only part of the foundation and you will have to reuse these boards.
Step 6: Pouring the Mortar
We prepare a mixture of cement, sand, crushed stone and water. It is very important to keep the proportions correctly. For example, for M300 you can take 10 kg of cement, 30 kg of sand, 40 kg of crushed stone, mix everything well and fill it with 40 liters of water. If the concrete is too dense, you should dilute it with liquid, but only add it in small parts so as not to spoil the solution. We pour concrete into the formwork and wait several days until it completely hardens. We moisten it periodically, otherwise cracks may appear.
Step 7: Formation of a columnar foundation
Making such a foundation is important when a lightweight extension is adjacent to a wooden house. We drill holes so that they are below the freezing level of the soil. We form a sand cushion and install fiberglass reinforcement. This material has excellent properties and does not require additional treatment with waterproofing compounds. Formwork of specified dimensions is also formed and filled with concrete. This foundation for an extension is the easiest to implement, and everyone can create it with their own hands.
Step 8: Construction of a separate foundation
But when the number of storeys of the main and adjacent housing is different, then a separate foundation should be made in close proximity to the previous one. The distance between the two bases is from 2 to 5 cm, depending on the number of floors of the new room. The higher it is, the wider the seam is selected. We fill this gap with heat-insulating materials or tow. Then a special decorative overlay is attached to the wall of the home. It is very important to correctly mark the base. To do this, we pull the cord onto the pegs around the perimeter of the future site and check whether the diagonals are equal. If a heaving type of soil predominates on the site, then the floor of the extension must be made so that it is not lower than the flooring of the main housing by the amount of possible deformations.
18.05.2017
Solving the housing problem if you have your own private house is much easier than in a city apartment. The best option is to make an extension that can be used for a variety of purposes:
- full-fledged living space - additional room;
- living space with an attic (if the extension is two-story);
- utility room - its own pantry, which can largely replace a cellar;
- a spacious terrace or veranda where you can relax with the whole family;
- garage for cars.
Below we will discuss the basics of the technology and step-by-step instructions for creating an extension to a wooden house.
Before choosing a specific building material and technology for constructing an extension, it is important to clearly define the purpose of the room. Perhaps you should immediately plan to create an extension in which it will be possible to live year-round - in case the family expands or a large number of guests arrive.
Types of extensions
There are several types of extensions to a wooden house. They differ in material, as well as installation features:
- frame extensions;
- from cylindrical timber;
- made of brick;
- from cinder block.
Before erecting a structure, it is important to take into account all the nuances that may affect the choice of materials and the specific type of extension:
- The condition of the house, which determines the interface of the structure. An extension can be made as an extension of the house by expanding the roof roof, as shown in the figure.
- The peculiarity of the area - whether there is a lot of groundwater in the soil, whether additional soil drainage is required. This is important to consider when building two-story extensions to prevent the risk of subsidence.
- What will be the purpose of the extension - a place to live or only for economic use. This factor greatly influences the choice of building material: for residential premises you need to use insulation and make the walls thicker, while domestic extensions can be created, for example, from simple cinder blocks.
Making the right choice of a specific extension project means correctly correlating the purpose of this structure, the features of the house to which it is attached, with the technology and material of manufacture. To do this, it is important to understand how each type of such structure is built.
Do-it-yourself frame extension: step-by-step instructions and video
A frame extension has a number of advantages:
- the design is quite simple, and if everything is calculated correctly, it is quite possible to do it yourself;
- it is erected much faster than brick and cinder block structures;
- the design is quite light in weight and does not require much effort during operation;
- In terms of thermal insulation, durability and other consumer qualities, a frame extension to a house is not inferior to other types of structures.
NOTE. If you intend to build a two-story extension, it is worth considering this option - the structure is lightweight and will not create excessive pressure on the ground, so the risk of subsidence is noticeably reduced.
Preparation for construction
At the preparatory stage, it is important to solve the following tasks:
- What will the frame material be - wooden beams or metal profiles?
- What type of extension will be connected to the main building?
- Accurately calculate all dimensions of the structure and develop a detailed drawing.
- Collect all necessary materials and tools.
First of all, it is important to decide what type of structure will be built - as a continuation of the house with an increase in the main roof to install a single roof, or as an adjacent building.
It is clear that the second case will be cheaper, simpler and faster - the extension will simply be adjacent to the wall. You can make access from the house directly into it if you make an appropriate hole and install a door.
A diagram of the connection between the structure and the house is presented below.
Structurally, this solution consists of a roof placed on supports. The roof is standardly made of rafters and support boards. For a longer service life, it is advisable to insulate it and lay out a layer of waterproofing. As a rule, it is based on a regular strip foundation.
Interface with the main part of the house occurs at 2 points:
- wall;
- roof.
The connection in each of them has its own characteristics, which will be described below. A preliminary sketch of the extension, as well as practical tips to consider before starting work:
At the same time, for the roof of the extension it is better to choose a material that is elastic enough to make the necessary corrections. You can purchase corrugated sheeting (height within 1 cm) or soft tiles.
In this sense, slate or traditional ceramic tiles and metal tiles are not suitable.
The frame is made of wood or metal. In this case, all parts should consist of only one type of material - then the extension is more reliable and lasts longer.
NOTE. Even if the house is in good condition, but quite old, the rate of its subsidence will be several times higher than the subsidence of the extension. Accordingly, it is better not to use a rigid type of connection of the structure to the main wall. In this case, another type of installation is used - “groove-ridge”.
As for tools, you don’t need any special equipment: it is important to have a screwdriver, a saw, pliers, a building level and other tools for working with wood.
Installation work must be carried out by at least two people - some stages will require joint efforts.
Laying the foundation
The first stage of work is laying the foundation. Since in the vast majority of cases, the construction of a house does not involve the construction of a foundation for an extension, the foundation must not only be laid correctly, but also reliably connected to the main foundation.
NOTE. If you are designing the construction of a newly built house, it is better to take into account the extension right away. It can be made after some time, and laying the foundation along with the foundation of the main building is a technically correct option. In this case, the house and the extension will be a single whole, which will ensure their reliability.
The main requirements for the base of the extension are the following:
- reliability – stable maintenance of the weight of the structure without subsidence: especially important for extensions made of heavy materials or two-story structures;
- maximum identity with the main foundation in terms of material and laying depth;
- the most complete adhesion to the main foundation.
Most often, strip foundations are chosen for extensions, since they are quite capable of coping with such loads. However, installation features always depend on the type of soil. You can lay monolithic foundations, made of brick or concrete blocks, and fill them with drainage materials.
Schematic diagrams of the bases are presented in the figure.
The technology for constructing a strip foundation for an extension does not differ from the usual one. In short, a trench is dug, reinforced and filled with concrete.
Connecting the foundation to the main one
This is the most critical stage. which needs special attention. Traditionally, two types of connections are used:
- "tape-tape";
- "slab-slab".
According to the “tape-to-tape” type, the stages of work will be as follows:
- On the installation side of the extension, a trench is dug corresponding to the depth of the main foundation.
- Next, a hole half a meter in diameter is drilled at the base of the house - for the corners of the foundation of the extension. For all other parts, the hole corresponds to the diameter of the reinforcement at a depth of 2/3.
- The reinforcement is driven into the foundation of the house; a wooden wedge is used for this.
- The foundation of the extension is formed using the driven reinforcement.
Installation according to the “slab-to-slab” scheme is possible in 2 cases:
- the width of the main foundation allows for appropriate work (from 450 mm);
- the plate protrudes from the base (at least 300 mm).
Thanks to an extension, it is often possible to solve another important problem - strengthening the old foundation and thereby supporting a sagging house. Visual video instructions:
Features of laying the foundation in the case of an old house:
Installation of flooring in an extension
Correctly making the floor in the future room is important from the point of view of 2 factors:
- thermal insulation;
- surface evenness.
It is important to make a high-quality floor, especially in cases where the extension to the house will be used as an additional room with the possibility of year-round use.
The strip foundation allows you to install both a concrete floor and make it out of wood. In the case of a columnar base, it is only possible to produce a wooden covering.
Concrete floor
The sequence of technology for laying this floor looks like this:
- After constructing the strip foundation, all excess soil is removed from the internal gaps to a depth of 200 to 350 mm.
- Sand is poured into the bottom in a layer of 10-12 cm and carefully leveled.
- A 5-7 centimeter layer of crushed stone follows on top of the sand. Instead, you can use expanded clay. In the case of a northern climate, this option is much preferable.
- A reinforcement grid is laid on a leveled layer of expanded clay and crushed stone.
- On top of it, you definitely need to make a system of beacons using a building level. It allows you to make a floor with a flat horizontal surface.
- Finally, a cement solution is poured onto the surface and carefully leveled. He must lie for at least a day in this state. Before laying, it is advisable to check the weather - such work is best carried out in the absence of rain.
- After 1-2 days, the concrete is covered with polyethylene so that it matures evenly throughout its thickness. This design will be more durable and smooth.
The concrete surface is quite cold, so this floor needs careful insulation, especially in the northern regions.
Wooden floor
A floor created on the basis of wooden floors is perfect for a columnar or strip foundation. It needs additional treatment to prevent rotting, but wood flooring is much warmer than concrete.
The installation sequence for a wooden floor looks like this:
- If an extension to a house is being built as a permanent structure, then preparatory work is carried out to lay sand, crushed stone or expanded clay, as in the case of a concrete floor.
- A roofing felt substrate is placed on the foundation.
- Load-bearing beams are laid on it. If the foundation is columnar, then they are mounted directly on the pillars, the length is adjusted in accordance with the interval. If the foundation is strip, it is important to install intermediate pillars at a certain interval or use long beams if the extension is small in area.
- A wooden covering is mounted on the beams.
All wooden parts must be carefully treated with varnish to prevent rotting.
A clear example of installing a wooden floor in a cinder block extension is shown in the video.
Frame installation
The next stage is associated with the direct construction of the frame structure. To do this, you first need to install the strapping beam. If it is assumed that the wall thickness will be 200 mm, then the dimensions of the end bar will be 25-40 mm, as shown in the detailed diagram.
The end result is a design that looks something like this.
Cutting out the groove in the base can be done completely or incompletely. Can be jointed without cutting using a steel angle.
The lower harness is performed in several stages:
- The nest is mounted in the insert.
- The overlay is nailed into the base.
- The support post is secured with a bracket.
The top trim is formed for reliable installation of the floor beams, as shown in the diagram.
NOTE. The interval between the vertical supports should be at least 50-60 cm, since in this case it will be possible to easily lay insulation materials (mineral wool, polystyrene foam, ecowool, etc.). In addition, there is no practical need for a more frequent arrangement of racks.
The general design of the frame is shown in the diagram.
The construction of walls occurs according to the following algorithm:
- Installation of a pre-fabricated lower trim on the foundation. The harness is screwed using dowels.
- Vertical beams are nailed to the wall of the house if rigid fastening of two structures is expected. If you just need to build a nearby building, then first make corner posts with temporary fastening.
- Vertical bars are installed. Their height is selected depending on the number of storeys of the structure, as well as on the method of connection to the main roof of the house.
- Next, the top trim is mounted.
- The last stage in installation is making holes for windows and doors.
ADVICE. If you plan to build a large extension with a large number of beams, then it is more convenient to assemble the frame separately, installing all the beams on the lower frame. In this case, there is no need to fasten each element using temporary slopes.
Assembling the roof and connecting it to the main roof
Installation of rafters is carried out in the same way as for a regular roof, however, the need to connect the roof with the roof of the house gives rise to a number of features of this work.
In general, the finished structure can be schematically depicted as follows.
After erecting the frame, the roof material of the house on the side of the extension must be disassembled so that the rafters appear. It is to them that the connecting rafters of the extension are mounted. Installation is carried out according to the principle of a rigid triangle, while it is important to place an additional beam in front of the acute corner (shown by arrows in the figure). These elements also serve as an additional measure of protection during snowfalls, which is why they are also called snow supports.
The sequence of actions for installing the roof can be briefly described as follows:
- The rafters from the extension are mounted with the top frame frame.
- The upper end of the rafters is connected to a purlin, which is pre-installed on the roof or attached directly to the roof rafters.
Video installation features
NOTE. You should not connect the rafters of the extension to the house in a rigid manner. This can damage the structure due to uneven rates of shrinkage of the main room and the extension. The optimal solution to this problem is the use of a sliding structure that ensures free movement of the lower support.
Finishing and insulation of the roof
At this stage, the roof is completely finished with its sealing and insulation, as shown in the diagram.
NOTE. If the roof of the extension simply adjoins the wall of the house, and does not organically connect with its roof, then a sealant is used for insulation, tightly closing the hole between the roof and the wall, as shown in the diagram.
Construction and insulation of walls
One of the last stages is the construction of walls and their insulation. An extension is a durable structure, and even if it is used only for economic purposes, it is important to create sufficiently good insulation so that temperature changes cannot damage the internal surfaces of the walls and ceiling.
The structure of the wall can be schematically represented as follows.
In fact, this is the final stage of the construction itself. Next, the following work should be done:
- finishing work inside the extension:
- exterior cladding of the building;
- creating a transition to the house;
- production of windows and doors in the building;
- carrying out all necessary communications.
It is important to treat all wooden structures with special solutions that prevent rotting and the harmful effects of temperature changes.
Timber extension
The fundamental stages of constructing an extension (pouring the foundation, constructing walls and installing the roof, followed by insulation and finishing work) do not depend on the choice of a specific construction material. However, depending on it, their own technologies are selected, which differ markedly from each other.
Construction of the foundation
In the case of an extension made of timber (profiled or round), the differences begin already at the stage of laying the foundation. Since the weight of the future extension will be significantly greater than the weight of the frame analogue, accordingly, the base needs to be more reliable.
Often a tiled foundation or a pile foundation is used, less often a strip foundation (for small extensions it is quite suitable). In any case, it must be established for at least 1 year.
From the point of view of simplicity and cost reduction of work, the best option would be to create a pile foundation, which can be built independently of the main foundation of the house.
Video - basic technology for installing a pile foundation
Walling
Building walls is quite simple from a technological point of view. The only drawback of the beam is that it is quite heavy, and at least two people need to work with it.
The fastening materials used are:
metal staples and plates;
- brackets;
- steel corners;
- self-tapping screws, screws, nails.
Technology for laying round timber when building an extension to a house:
Other works
The technology of wall construction, insulation and finishing is not fundamentally different from that described earlier.
In the case of building a structure from timber, two-story structures can be easily made. Of course, in this case, special requirements are placed on the foundation and floors.
Brick extension
Brick extensions to a wooden house are built less frequently. They are great for living, they can also be used as a utility room.
Most often in such cases a monolithic foundation is used. In this case, the brick structure can serve as the basis for the construction of a second similar floor or attic. Installation of floor and roof technology is not fundamentally different from those discussed above.
Cinder block extension
And another cheaper and faster option for building an extension to a wooden or other house is from cinder blocks (foam blocks and gas blocks are also used). Such a room can serve as an additional room, but is most often used for household purposes.
The construction of a cinder block structure occurs very quickly due to the large size of the building material. This option is great if the owners want to make a garage for a car or an ordinary canopy or veranda.
And finally, a short video overview of the main stages of constructing a frame extension to a wooden house.
You may like
If you own suburban real estate, you have probably at least once thought about increasing your living space. It is not always possible to have the financial capacity and strength to purchase a new house or build it anew; increasing the area of an existing building may be a solution. In any such construction, the most important stage is the creation of a high-quality foundation for the extension.
Design Features
If you are thinking about the question of how to make a foundation for an extension to a house, then you should listen to the opinion of experts who advise forming a foundation of the same design as the foundation of the main building. This is because different foundations can interact with the soil differently, which can cause different settlements. Therefore, do not save money and build reliable, identical foundations. Before making a foundation for an extension to a house, you must choose one of three existing methods for connecting the foundations. The first involves the formation of a monolithic foundation, which will be connected by thick metal reinforcement. The second method involves the construction of foundations independent from each other, between which an expansion joint will be located. The third technology is a pile-screw foundation. Before pouring the foundation, it is necessary to take into account the severity of the extension and what characteristics the soil has.
A solid foundation is excellent for a building that has been in use for several years and, thanks to the uniform soil, does not shrink. Otherwise, it is recommended to make a separate foundation, connecting it to the main one using an expansion joint. Regardless of which method of creating the foundation was chosen, it should be deepened exactly as much as the foundation of the main house was deepened. Sometimes the foundation is placed slightly higher, taking into account shrinkage.
Foundation on rigid reinforcement
If you are faced with the task of making a foundation for an extension to a house, then you can create a foundation on rigid reinforcement that is suitable for an established house. The shrinkage of the latter must be completed at the start of construction work. This design is not suitable for heaving soils.
Work methodology
Initially, it is necessary to measure the depth and dimensions of the old foundation, only then can you begin preparing the trench. Its depth should not be greater than the depth of the foundation. Holes with a diameter slightly larger than the diameter of the reinforcement are made in the old base. The depth of the holes must be determined by the following formula: for this, the diameter of the reinforcement should be multiplied by 35. If the width of the base is not enough for the hole, then the reinforcement must be driven in; for this, a longitudinal cut is made at the end, and then wedging liners are installed. This method of fixing reinforcement is quite reliable.
Working with reinforcement
If you are thinking about how to make a foundation for a brick extension to a house, then the method described above is perfect. To do this, you need to calculate the number of rods. For a closed loop of a new structure, about 20 elements are most often required for each square meter of foundation. The components are cut with an angle grinder or using an emery machine. If we are talking about an open contour, then the number of reinforcing bars can be determined individually, depending on the width of the future foundation. Rods should be installed in the drilled holes, but before this, washers are welded to their ends.
Quite often, home craftsmen are interested in how to make a foundation for an extension to a house. Enlarging the room will allow this to happen. Speaking of the above, it should be noted that further actions involve the creation of formwork into which the reinforcement is laid. The resulting space is filled with concrete. Then the solution is left until completely hardened, after which the master can begin construction work.
Cases of using rigid foundation joints
Rigid joining is used when the extension is combined by a common roof with the main building, as well as when there is a strip foundation. This method of connecting foundations is also used in the case when the building is installed on a columnar foundation, and the fastening is carried out on the plinth. This indicates that this element must have the required height and width. Rigid joining of two structural elements can be used in the presence of a shallow strip-type foundation, when it is part of one monolithic type system.
Formation of a separate foundation
Before making a foundation for an extension to a house made of timber, you need to take into account that the most popular and simplest way is to build a separate foundation. In this case, the foundation will be located quite close to the main building, and an expansion joint should be installed between the structures. The function of the layer is to protect the structure from deformation and cracking during shrinkage. To form a seam, it is necessary to use a moisture-resistant heat-insulating material, tow or roofing felt. Considering that the structure will still shrink, the foundation should be laid higher than the finished one.
Work technology
If you are thinking about how to make a foundation for an extension to a house, it is recommended that you consider the photo in advance. They will allow you to understand which technology is best to carry out the work. The gap between the new and old foundation when forming a separate foundation should be 5 centimeters. Before concreting begins, boards covered with a layer of waterproofing are applied to the finished base. In the future, these elements will act as expansion joints. If there is a small extension on one floor, a seam with a thickness of 2 centimeters will be sufficient. Filling the resulting space can be done with heat-insulating material, which is often penoplex or polystyrene foam. And you can close the gap with a sealant that is resistant to atmospheric influences. From the outside, everything can be disguised with a decorative overlay.
The foundation for an extension to a block house can be created using this technology, since it is the most acceptable.
Creating a columnar foundation
If the extension is supposed to be formed from light materials like wood, then the best option would be an inexpensive foundation on pillars. If the dimensions are limited to 7x3 meters, then it is enough to prepare 6 support pillars. It will be necessary to drill a hole in the soil, going deep below the freezing level of the soil. A sand cushion is laid at the bottom, fiberglass reinforcement is installed, and then formwork of the required size is placed. The resulting hollow space should be filled with concrete, and if it is necessary to increase the height of the supports, red brick masonry should be made.
Foundation on stilts
When professional builders think about how to make a foundation for an extension to a house, they most often resort to the method of forming a foundation on screw piles. This is due to the fact that this design is the cheapest and simplest for light buildings. One disadvantage is susceptibility to corrosion, but this can be eliminated by anti-corrosion treatment. Installation work can be completed in the shortest possible time, after completion of the work it is permissible to begin further construction. For a small object, the supports can be screwed in yourself, which will reduce the cost of work.
Concrete preparation
Before making a foundation for an extension to a house with your own hands, you should inquire about how concrete is mixed correctly. The success of further work will depend on its quality. The darker the color of the cement, the more reliable and stronger the mixture will be. If you have not yet encountered the mixing process, you should remember the correct sequence of placing components into a concrete mixer. Initially, water comes in, then crushed stone, sand and cement are laid. The sequence must be followed to achieve uniformity of the composition. While all the ingredients are being mixed, the concrete mixer should be turned on, but while the equipment motor is resting, you can measure out the ingredients and bring them for subsequent mixing.
Conclusion
If you are faced with the question of how to make a foundation for an extension to a house made of blocks, then you can use the above recommendations. They require the use of appropriate mechanical equipment for mixing the solution. This will prevent the formation of a seam between the poured layers.
An extension to a house is an independent structure, the installation of which is possible in two ways.
With proper thermal insulation, a constant temperature is maintained in the frame extension for up to 7 hours.
The first method is the simultaneous construction of an extension to the house with the main frame. Its advantage is that with such construction there are no problems with joining the walls of two foundations, the main room and the extension. The second method is to add a new room to the frame of an already finished house. Whatever method you use, it is important to make the foundation for the extension in accordance with all reliability requirements. Both bases interact closely with each other. Therefore, before pouring the foundation for an extension, it is important to obtain the following information:
- type of foundation of the house to which the extension is planned: level of foundation, design, area and pitch of the columnar foundation, width of the base if the foundation is strip;
- type of construction site soil: type and physical and mechanical properties, their calculated resistance at the base of the structure, heaving properties within the freezing depth.
How to determine the characteristics of the foundation of a house in the absence of construction documentation?

An example of a diagram of the internal wall of an extension.
If documentation confirming the characteristics of the building has not been preserved or, as often happens, was not maintained at all, then additional efforts will have to be expended to determine it. In this case it is necessary:
- dig a hole to the depth of the foundation at the junction of the extension;
- determine its type, width, possible presence of a sand cushion;
- determine the parameters of the supporting part of the foundation of the house;
- take soil samples for laboratory analysis and determine its physical and mechanical characteristics, the calculated resistance of the foundation base and the degree of heaving of the foundation.
To determine the width of the strip base, a steel rod with a hook bent at the end is driven under its sole in a horizontal position. Then the rod is turned so that the hook is in a vertical position, tightened back until it stops and a mark is made on the pin. After this, the hook is again deployed horizontally and pulled out from under the base. The width of the tape will be equal to the length of the marked part of the rod. Based on the above data, a decision is made on the type of construction of the foundation of the extension and the method of connecting it to the foundation of the house.
Return to contents
Definition of reliability

The reliability of the foundation is an equally important parameter for both the main structure and its extension. Thus, in non-heaving soils, where the depth does not depend on the depth of freezing, the reliability of the foundation is ensured when the parameters of the supporting part are calculated based on the load of the structure and the resistance of the soil at the level of its foundation. The foundation settlements in such soil, if these conditions are met, will be within normal limits. Practically non-heaving soils are gravelly, high- and medium-sized sands and coarse-grained soils. During construction under such conditions, they are usually insignificant. They stop immediately upon completion of construction work. A structure erected in heaving soils can be considered reliable if:
- in calculating the dimensions of its supporting part, parameters such as the load of the house and the resistance of the soil under the base of the foundation are involved;
- the heaving deformation of the foundation under the influence of tangential forces during soil freezing at the calculated depth is zero.
A buried foundation in heaving soils allows only sediment deformation. The reliability of a shallow foundation in heaving soil is ensured if three conditions are met:
- support parameters are determined by calculating the loads of the structure and the resistance of the sand cushion or the underlying soil;
- freezing of heaving soil at the foundation depth does not lead to heaving deformation under the influence of tangential forces;
- heaving deformation when heaving soil freezes below the base of the foundation does not exceed permissible standards.
Return to contents
Options for connecting the base of the extension to the main structure
To make the foundation of an extension, you need to know two options for connecting it to the foundation of the main structure.
The joints of the foundation of a house are designed in two ways:
- Rigid connection with reinforcement.
- Expansion joint.
Return to contents
How to make a foundation with a rigid connection of bases?

Rigid connections are often used on soils that are not subject to heaving.
Rigid connection is used mainly in low-rise construction, where the extension is functionally connected to the main structure, being under the same roof with it. To make the base for the extension, a hole is drilled in it with a diameter equal to the diameter of the reinforcement and a depth equal to about 35 of its diameters. Next, reinforcement is driven into it with an outlet of the same length. If the extension is carried out according to a scheme where the estimated length of the reinforcement is greater than the width of the foundation, then the holes in the foundation of the main structure are made part of the width, and the reinforcement is mounted according to the principle of an anchor, with a wedging liner at the end.
In a closed loop, the holes are drilled in a staggered pattern at two levels, and the reinforcement used has an anchor wedge at one end and a welded washer at the other end. The amount of reinforcement, its pitch and diameter are calculated based on the conditions of its least resistance to shearing and crushing of the concrete underneath it. On average, a closed contour of a new foundation will require 20 rods per square meter of foundation. They are cut using an emery machine or grinder. With an open contour, the number of reinforcement bars is calculated separately in each case and depends on the width of the future foundation.
A rigid connection is used when the recessed strip base of the house and extension is made of monolithic reinforced concrete, and with a shallow type of foundation, the base and foundation form a single monolithic structure. and plinths do not provide a reliable connection, and with a columnar foundation, a rigid connection is possible provided that the height of the monolithic grillage is sufficient for installing anchors. A slab foundation allows for a rigid connection provided that there is a protrusion from the base no less than the thickness of the slab. In this option, you can expose the reinforcement frame of the house and connect it (weld, tie) with the reinforcement frame of the extension. A house with a basement can be connected to a basement-free extension with a rigid coupling if the base of the main building and the recessed walls are monolithic.
Using an expansion joint

Expansion joints are more often used in multi-storey residential and industrial construction, where under a long structure in different parts of it, the soils differ significantly in deformation characteristics and, under the same loads, settlements can differ significantly. Such seams are used for different number of storeys in different parts of the structure, thus giving different loads and different settlement deformations. Another case of using expansion joints is when another structure is attached closely to an existing structure. In the above options, expansion joints should be provided at the design stage. It is often easier and cheaper to use expansion joints in heaving soil.
An expansion joint is an insulation material placed in the gap between walls and basement floors, without adhesion to structures. Often simple tow is used as such insulation. The junction is enclosed with a decorative overlay attached only to the wall of the house. In heaving soil, when using an expansion joint, the floor level of the extension is placed below the floor level of the main structure by the amount of expected deformations.

The filler is removed from the expansion joint area to a sufficient depth for laying the sealant.
What you should consider to make a foundation for an extension using an expansion joint:
- the gap between the bases of the extension and the main structure should be about 5 cm. To comply with this requirement, before making the foundation of the extension, boards covered with waterproofing are applied to the base of the house. They will play the role of an expansion joint in the future;
- for a small one-story extension, the thickness of the expansion joint can be 2 cm;
- the seam can also be filled with thermal insulation material (foam or polystyrene foam is best) and sealed with weather-resistant sealant. From the outside it is closed with a decorative overlay.